Create a Wedding Photo Album Your Family Will Always Cherish
To create a wedding photo album you'll cherish forever, start by gathering photos from everyone, not just your photographer. The secret is using a simple QR code system for instant, app-free photo uploads from your guests. This ensures every candid moment is captured and seamlessly consolidated in one central place right from the start.
Your Ultimate Guide to the Perfect Wedding Photo Album
Your wedding day is a whirlwind of beautiful, fleeting moments. You’ve got the carefully planned portraits, sure, but what about the spontaneous bursts of laughter on the dance floor? Creating a wedding photo album is the art of weaving all these memories into a tangible story you can hold and share for generations.
It’s so much more than just a book of pictures; it’s an heirloom that preserves the emotion, joy, and unique spirit of your celebration.
But that journey begins long before you start picking out page layouts or cover materials. The most crucial first step is getting every single precious photo into one organized digital gallery. This means combining the stunning shots from your professional photographer with the heartfelt, candid moments captured by your friends and family. A complete collection is what tells the full story.
Why Every Photo Matters
Think about it. A single photographer, no matter how amazing, can't be everywhere at once. They might miss your cousin's tearful smile during the vows, a behind-the-scenes toast among college friends, or the flower girl's impromptu dance moves. These are the snapshots that add real depth and personality to your wedding story.
Thankfully, modern solutions make collecting these photos incredibly simple. The days of chasing guests for pictures or relying on clunky social media hashtags are over. The focus now is on ease of use and seamless consolidation.
- Instant Photo Uploads: Guests just scan a QR code with their phone and can upload photos directly to your private gallery. The process is immediate and effortless.
- No App Required: This frictionless approach means way more people will participate since no one needs to download or sign up for anything.
- Seamless Consolidation: Every image, from every guest, lands in one easy-to-manage location, ready for you to start curating.
This simple, three-step approach—Gather, Curate, Design—is the modern way to build your album, and it all starts with getting your photos in one place efficiently.
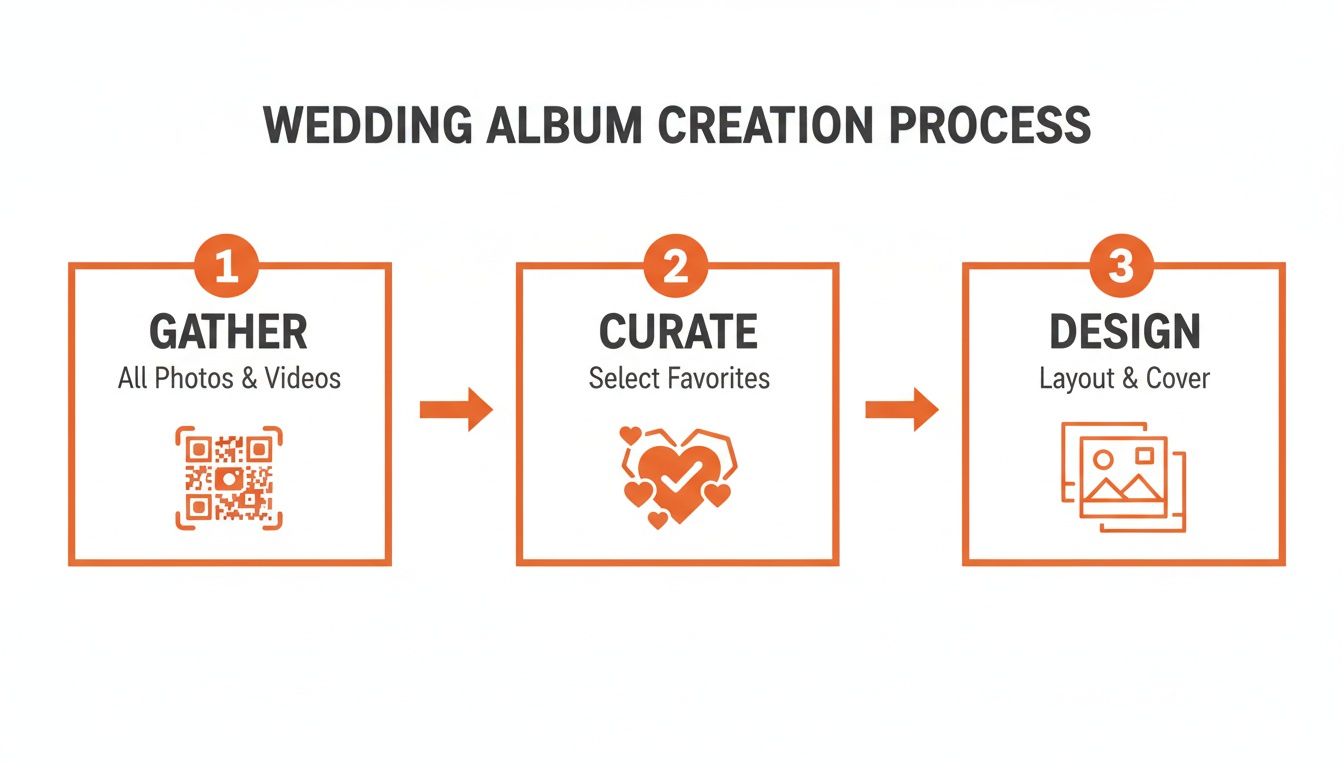
The real takeaway here is that a successful album project is built on a strong foundation. You have to get the photo collection right before you even think about design.
More Than Just Weddings
While the primary focus is on weddings, this effortless photo-gathering method is versatile enough for any big event. Imagine using the same QR code system for:
- Birthday Parties
- Corporate Gatherings
- Family Reunions
- Anniversary Celebrations
The principle is the same: make it incredibly easy for everyone to contribute their unique perspective. For example, you can display your event’s QR code at the venue entrance or on invitations for instant photo uploads, making sure no memory gets left behind.
Of course, the quality of your photos is what makes an album truly perfect. To ensure your images are as stunning as possible, consider the impact of professional photography backdrops. A solid foundation of high-quality images is what the entire album creation process is built upon.
The wedding photography market hit $15 billion globally in 2023 and is projected to reach $24 billion by 2032, which just shows how crucial professional photos are. This boom, driven by events like the 2.1 million U.S. weddings in 2023, fuels the demand for beautiful, lasting albums.
Wedding Photo Album Creation At a Glance
To make sense of the whole process, this table breaks down the key phases, from gathering images to holding the finished product in your hands.
| Phase | Key Objective | Recommended Tool/Method |
|---|---|---|
| 1. Gather | Collect all professional and guest photos into one secure, centralized digital gallery. | QR Code System (e.g., WedPicsQR) and Photographer's Gallery |
| 2. Curate | Select the best photos that tell the story of your day from start to finish. | "Favorites" folder in your gallery, collaborative selection with your partner |
| 3. Design | Arrange the curated photos into a compelling narrative with a clean layout. | Album design software (offered by most print services) or professional designer |
| 4. Print | Choose cover materials, paper quality, and a printing service to produce the physical album. | Reputable album printing companies (e.g., Artifact Uprising, MILK Books) |
Following these phases in order takes the stress out of the project and ensures you end up with an album you'll absolutely love.
Grab Every Candid Moment with QR Codes
Your professional photographer is a master at capturing those gorgeous, frame-worthy portraits. But let's be honest—some of the real magic happens in the moments they don't see. The spontaneous bursts of laughter, the teary-eyed reactions during speeches, the absolutely wild dance floor moves... those are the moments that tell the full story of your day.
For years, the biggest headache was figuring out how to get all those scattered memories in one place. Couples would spend months chasing down guests, getting lost in chaotic group chats, or endlessly scrolling social media for a specific hashtag. You’d end up with a handful of blurry, incomplete photos that just didn't do the celebration justice.
The Modern Fix for Instant Memories
Thankfully, technology has given us a much simpler way to bring all those photos together. The secret? A QR code system that lets your guests instantaneously upload photos straight from their phones. This little trick removes all the usual friction, making it ridiculously easy for everyone to share.
The best part is its sheer simplicity. There is no app to download and no account to create. Guests just scan the code, a direct upload link pops up on their phone, and they can share their favorite snapshots in seconds.
This seamless approach gets way more people involved. Instead of the usual 20-30 guest photos, couples using this method often collect hundreds of images and videos. The result is a rich, diverse gallery that perfectly complements your professional shots.
Make It a No-Brainer for Your Guests
To get the most out of a QR code, you have to make it visible and impossible to miss. The goal is to weave photo-sharing right into the fabric of your event. Here are a few battle-tested ideas:
- Display your event’s QR code at the venue entrance or on invitations for instant photo uploads. This catches guests as they arrive and sets the expectation early on.
- Place small, elegant cards with the QR code on each reception table. Guests will have their phones out during dinner or between dances, making it the perfect time to scan and upload.
- Tuck the code into your bar menu or next to the guest book. These are high-traffic spots where people naturally gather.
By making photo sharing an easy, integrated part of the celebration, you're not just collecting pictures. You're inviting your guests to become co-creators of your wedding story, making them feel more engaged and valued.
Beyond the "I Do's"
While this system is an absolute game-changer for weddings, its usefulness doesn't stop there. The core idea—easy, app-free photo collection—is perfect for any gathering where memories are being made. You can use the same QR code approach for:
- Birthday Parties: Capture every smile at a milestone 30th or a child's first birthday bash.
- Corporate Gatherings: Easily pull together photos from team-building events, holiday parties, or conferences.
- Family Reunions: Finally get all the photos from multiple generations and households into one shared family album.
- Anniversaries and Graduations: Preserve the memories of huge life achievements with photos from everyone who attended.
No matter the occasion, the focus is always on ease of use. A QR code strips away the complexity, ensuring no precious moment gets lost. If you're deep in wedding planning, we've got a full guide on how to collect photos from wedding guests that you won't want to miss.
Ultimately, the richness of your wedding photo album comes down to the variety of photos you have to work with. Using a QR code ensures your collection is as complete and authentic as possible, filled with both the picture-perfect portraits and the priceless candid moments that, together, tell the true story of your day.
Crafting Your Wedding Album's Narrative

Alright, your digital gallery is officially overflowing. You've got the stunning shots from your photographer and a whole bunch of candid, heartfelt photos from your guests. Now for the fun part: turning that beautiful mess into a story.
When you create a wedding photo album, you’re not just sticking pictures on a page. You're building an emotional time machine. The goal is to curate a collection that takes you right back to the feeling of that day, every single time you open it.
Your job now is to be the director of your own love story, picking the photos that capture everything from the quiet jitters before the ceremony to the wild energy on the dance floor. It's a personal project, and it's a big deal—so much so that it’s become a massive industry.
The market for wedding photo albums is valued at around $3.81 billion, with family albums making up nearly 80% of that. It’s a clear sign that people are craving tangible keepsakes over fleeting digital posts. For a deeper dive into the numbers, check out the full wedding album industry report.
Building Your Story Chronologically
The easiest and most effective way to structure your album is to just follow the day as it happened. It creates a natural flow that anyone can understand, from your grandma to your future kids.
Think of your album as a book with distinct chapters. This simple trick helps you organize your thoughts and ensures you don't miss any key moments.
- Getting Ready: This is where the story begins. Capture the nervous excitement, the details you spent months planning, and those last few moments with your best friends and family before everything kicks off.
- The Ceremony: The emotional heart of the album. This chapter needs the big moments—walking down the aisle, the first look, exchanging vows, the kiss, and that triumphant exit as a married couple.
- Portraits and Group Shots: Give those gorgeous, posed shots their own space. This is for the portraits of just the two of you, as well as the pictures with your wedding party and all the important family combinations.
- The Reception: Now, tell the story of the party. Start with the grand entrance and first dance, then move through the toasts, the cake cutting, and all the fun on the dance floor.
Structuring it this way turns a pile of photos into a narrative that truly unfolds.
Balancing Professional and Candid Photos
This is where the magic really happens. Blending your photographer’s polished images with the raw, in-the-moment snapshots from your guests is what will give your album its soul. The professional shots are your beautiful, high-quality anchors, but the guest photos fill in the story with pure personality.
Think about it: your photographer probably got the perfect, sweeping shot of your first dance. But a guest might have caught the tear rolling down your dad’s cheek as he watched from his table. You need both to tell the whole story.
Weave guest photos throughout the album to add texture and authenticity. A slightly blurry, joy-filled shot from the dance floor can capture a feeling that a perfectly composed photo sometimes misses. That mix is what makes the album yours.
For more advice on nailing this mix, take a look at our complete guide on how to select the best wedding album photos.
Ensuring a Cohesive Look
Once you’ve made your final selections, the last step is to make sure all the photos look like they belong in the same book. Don't worry, you don't need to be a photo editing wizard. Most modern album design software comes with simple filters and basic editing tools that make this easy.
Just focus on creating consistency in a few key areas:
- Lighting: Some guest photos might be a bit dark. A quick brightness adjustment can help them sit nicely next to the professional shots.
- Color Tone: Applying a single, subtle filter across all the photos can unify the color palette and give the whole album a consistent feel.
- Style: Decide on your approach to black-and-white photos. Do you want them all grouped together, or sprinkled throughout? A little planning goes a long way.
These small tweaks are what will elevate your album from a simple collection of photos to a polished, professional, and completely timeless keepsake.
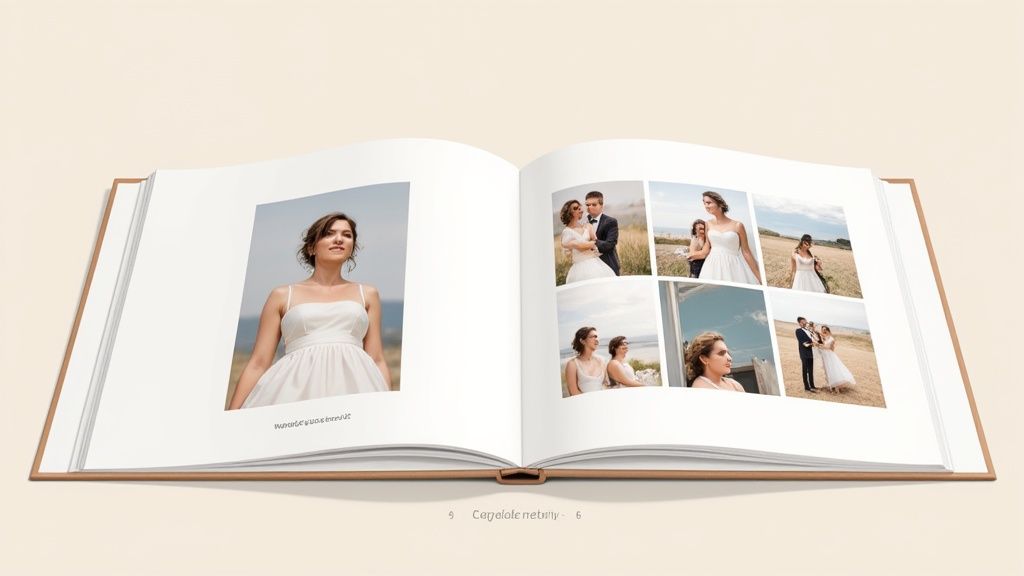
Designing a Visually Stunning Album Layout
Okay, you've sifted through hundreds (maybe thousands!) of photos and picked your absolute favorites. Now for the fun part: bringing your story to life on the page.
Designing your album layout is where you get to be the creative director. This is your chance to turn a simple collection of pictures into a polished, coffee-table-worthy book that tells your story with real impact. It might sound a little intimidating, but you don't need to be a graphic designer to pull this off. It's all about letting the photos do the talking.
One of the best ways to get that high-end, professional look is with a layflat album. These have thick, rigid pages that open up completely flat, creating one seamless, panoramic spread. It means you can print a single jaw-dropping photo across two pages without that ugly gutter or crease running down the middle and ruining the shot.
Mix Up Your Page Layouts for Maximum Impact
I see this mistake all the time: every single page has the same grid of four photos. While neat, it gets boring fast. A truly captivating album has rhythm and variety, mixing big, dramatic moments with smaller, quieter details.
-
Go Big with "Hero Shots": These are your showstoppers. Think the first kiss, the dramatic exit, or that epic portrait with a killer sunset. Give these photos the space they deserve by dedicating an entire two-page spread to just one image. It makes a statement.
-
Create Candid Collages: For moments full of energy—like the dance floor shenanigans or guest reactions during the toasts—group smaller, related photos together. A collage on a single page or spread can capture the vibe of that moment perfectly.
-
Embrace Asymmetry: Forget trying to make everything perfectly symmetrical. An asymmetrical layout, with one large photo on one side and a couple of smaller ones on the other, feels much more modern and dynamic. It keeps the eye moving and makes the whole album more engaging.
The trick is to create a flow. Follow a huge, emotional hero shot with a page of smaller, detailed photos. This pacing keeps things interesting from cover to cover.
The Power of White Space
What you don't put on the page is just as important as what you do. White space (or negative space) is your best friend in album design. It’s the blank area around your photos, and it’s what keeps your pages from feeling cluttered and chaotic.
Don’t feel like you have to fill every inch of every page. A single, powerful photo surrounded by plenty of white space often has far more impact than a page crammed with ten pictures. It gives the image room to breathe and tells the viewer exactly where to look.
A well-designed album isn't just about what you put in; it's about what you leave out. Strategic use of white space elevates your album, giving it a clean, elegant, and timeless quality that feels high-end.
This focus on premium, clean design is a huge trend. In fact, flush mount wedding photo albums—the gold standard for layflat books—are part of a global market worth $3.8 billion in 2024. Weddings account for over 55% of that demand, precisely because couples want that seamless, professional look.
Choosing Your Wedding Album Style
There are a few popular album types out there, each with its own look and feel. This table breaks down the most common options to help you decide which one fits your style and budget.
| Album Style | Key Features | Best For | Average Cost |
|---|---|---|---|
| Layflat Album | Thick, rigid pages that lie completely flat. Photographic paper. | High-end, premium look. Ideal for panoramic "hero" shots. | $400 - $1,500+ |
| Flush Mount | A type of layflat where prints are mounted directly onto thick cardstock. | The ultimate luxury album. Professional quality and durability. | $500 - $2,000+ |
| Press-Printed Book | Thinner, flexible pages like a traditional book. Often has a slight curve in the center. | Couples on a budget or those creating parent albums. | $150 - $500 |
| Scrapbook Style | Photos are physically mounted onto pages. Can include other mementos. | A hands-on, DIY approach for a personal, crafty feel. | $50 - $300 |
Ultimately, the choice comes down to your personal taste and how much you want to invest in this family heirloom. Layflat and flush mount albums offer that timeless, professional quality that will look incredible for decades to come.
Tell a Story by Pairing Images Thematically
A truly great album flows not just chronologically, but also thematically. When you're arranging photos on a spread, look for connections that go deeper than just what happened next.
Try grouping images based on:
- Emotion: Pair a photo of you bursting into laughter with a candid shot of your best friend tearing up during the vows.
- Color: Create a visually stunning spread by clustering photos that share a similar color palette—like all the warm, golden-hour portraits.
- Subject: Dedicate a full spread to just the details: the rings, the invitation suite, the shoes, the bouquet. It gives those little things their own spotlight.
If you’re looking for a creative spark, checking out some guides to design templates can offer fresh ideas on layouts and modern aesthetics. For an even deeper dive into crafting a visual narrative, our article on designing beautiful wedding albums has you covered.
When you thoughtfully pair images, you create a much richer and more meaningful experience for anyone flipping through the pages.
Bringing Your Digital Album to Life in Print
You’ve done the hard part—gathering every photo, picking your absolute favorites, and designing the story of your day. Now for the best part: turning that digital file into a beautiful heirloom you can actually hold.
This final stage is all about quality control. It's where we make sure the album that lands on your doorstep is every bit as stunning as the one on your screen. Moving from a backlit display to physical paper involves a few key details, but trust me, they're simpler than they sound.
Mastering the Technical Details
Before you hit that "upload" button, there are two crucial things to get right: image resolution and color profile. Nail these, and you're well on your way to crisp, gorgeous prints.
Image Resolution (DPI): This stands for Dots Per Inch, and it’s basically a measure of photo detail. For printing, you want a resolution of at least 300 DPI. Photos you pull from social media or a text message are usually a much lower 72 DPI, which is why they look blurry or pixelated when printed. Always, always use the original, high-resolution files from your photographer and your guest collection gallery.
Color Profiles (CMYK vs. RGB): Our screens use an RGB (Red, Green, Blue) color profile, which is why photos look so vivid on a phone or computer. Professional printers, on the other hand, use CMYK (Cyan, Magenta, Yellow, Black). Any good album printing service handles this conversion for you, but it’s good to know that some super-bright colors might look a little different in print. It's just the nature of ink on paper.
Don’t get too hung up on the technical jargon. The big takeaway is this: always use the highest-quality image files you have. A great printing service can do a lot, but they can't create detail that wasn't there to begin with.
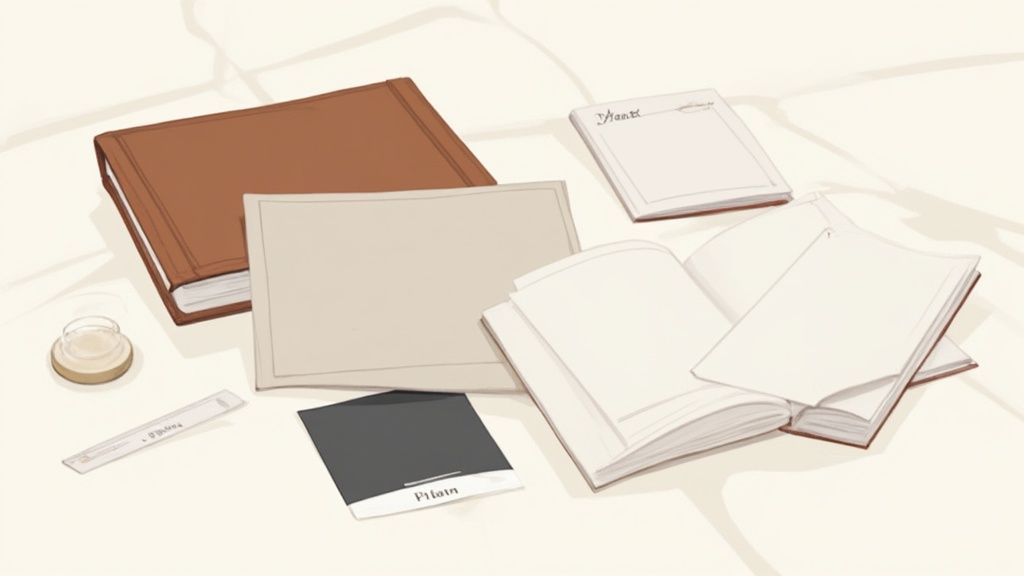
Choosing Your Paper and Cover Materials
The feel of your album is just as important as how it looks. The paper and cover you choose will define its personality and how well it holds up over the years.
-
Paper Finish: This choice can completely change the mood of your photos.
- Glossy: Makes colors pop with high contrast, but it's a magnet for fingerprints.
- Matte: A soft, non-reflective finish that hides smudges well and has a modern, artistic feel.
- Lustre: The most popular choice for a reason. It’s the perfect middle ground, offering great color without the high shine of glossy.
-
Cover Materials: This is your album's first impression, so make it count.
- Linen: A timeless, classic choice that comes in a ton of colors. It feels elegant and understated.
- Leather (or Vegan Leather): Gives you that luxurious, traditional vibe and is incredibly durable.
- Photo Cover: Puts one of your favorite wedding photos right on the cover for a completely personalized look.
There's no wrong answer here. It’s all about picking materials that match the vibe of your wedding day and your own personal style.
The Final Proofreading Checklist
Okay, before you send anything to the printer, it's time for one last, careful review. This is your final chance to catch any little mistakes before they're literally set in stone (or, well, paper).
Grab a coffee, sit down with your partner, and run through this list together:
- Check All Text: Seriously, triple-check the spelling of every name, the wedding date, and any captions. Typos have a way of hiding in plain sight.
- Review Image Placement: Make sure no faces or important details are sitting too close to the edge of the page. You don't want anything getting trimmed off during production.
- Confirm Photo Quality: Do one final scan. If any photo looks a bit blurry or pixelated on your screen now, it will look ten times worse in print.
- Verify the Chronology: Read through the album from beginning to end. Does the story flow naturally?
This final check is the best insurance policy you have when you create a wedding photo album. Taking an extra thirty minutes to proofread can save you from a whole lot of heartache and a costly re-print. Once you're done, you can hit "submit" with confidence, knowing a perfect heirloom is on its way.
Questions That Pop Up When Making a Wedding Album
As you start wrapping up your album, you’re bound to have a few questions. I’ve been there. Getting these last details right is what turns a good album into a great one. Let’s tackle some of the most common questions I hear from couples.
What's the Easiest Way to Collect Guest Photos?
Honestly? A QR code system. It's not even a contest anymore. This approach gets rid of all the usual headaches that stop guests from sending you their pictures.
It’s just so simple. You get a unique QR code and display your event’s QR code at the venue entrance or on invitations for instant photo uploads. Guests scan it with their phone’s camera, and it takes them straight to a private upload page.
The secret sauce here is the total lack of friction. Your guests don't have to download an app, create an account, or remember a password. That seamless experience is why it works—you get every single candid moment in one gallery with zero effort from anyone.
And while this is a game-changer for weddings, it’s brilliant for any event. Think birthdays, company parties, or family reunions. The same seamless photo consolidation works every time.
How Many Photos Should I Put in My Wedding Album?
There's no hard-and-fast rule, but the sweet spot is usually between 75 and 150 photos for a standard album with 30-50 pages. That averages out to about 2-4 photos per page or spread.
Remember, the goal is to tell a story, not just cram in every single picture. A cluttered album feels overwhelming and actually weakens the impact of your most powerful shots. By being selective, you give each moment room to breathe.
- Cover the Tentpoles: Make sure you have the big moments covered—the first look, the vows, the kiss, and the first dance.
- Sprinkle in Candids: Don’t forget those unposed shots of laughter, happy tears, and pure joy from both you and your guests. These are often the favorites.
- Capture the Details: You spent months planning the little things, so include shots of the rings, the flowers, the cake, and the decor.
A balanced mix of professional portraits and candid guest photos creates a much richer narrative than an album stuffed with hundreds of similar images.
How Long After the Wedding Should I Start on the Album?
My advice is to dive in within 1 to 3 months after your wedding. This is the perfect window. The memories are still fresh, and that post-wedding excitement is the best fuel for making creative choices.
Your professional photo gallery will typically land in your inbox within 4 to 8 weeks. Once you have those, you can start weaving them together with all the amazing guest photos you've already collected through your QR code.
If you wait too long, the whole thing can start to feel like a chore. By tackling it early, you'll find it much easier to pick the photos that truly capture the heart of your day. Try to get your album designed and ordered within six months of the wedding—that keeps the project fun and off your "I'll get to it eventually" list.
Ready to effortlessly collect every precious photo from your big day? With WedPicsQR, you can create a private gallery and a custom QR code in minutes. Guests scan, upload, and you get every memory, all in one place—no app needed.
Start your free gallery today at https://www.wedpicsqr.com and make sure no moment gets left behind.