How to Organize Digital Photos
If you're staring down a camera roll with thousands of photos—plus more on old laptops and hard drives—you know how overwhelming it can get. The secret to finally organizing your digital photos isn't some complicated software; it's a simple, actionable game plan I call the Four C's: Collect, Consolidate, Categorize, and Continue.
It all starts by corralling every last scattered image into one central, manageable place. This is how you turn digital chaos into a library of memories you can actually enjoy.
Finally Conquer Your Digital Photo Clutter
Feeling paralyzed by the sheer volume of your photos? You're not alone. Between smartphones, old computers, and those random cloud accounts we all forget about, our memories get scattered and, eventually, lost.
The goal here isn't perfection overnight. It's about making real, tangible progress. By setting up one central hub for everything, you lay the foundation for a stress-free system that puts you back in control.
And let's be real, the challenge is only getting bigger. Projections show that by 2025, we'll be snapping over 2.1 trillion photos worldwide every single year, with our smartphones doing 94% of the heavy lifting. This explosion of digital images makes a smart organization strategy more critical than ever. If you're curious, you can explore more data on this incredible growth and what it means for all of us.
The Four C's of Photo Organization
To keep from getting bogged down, I've found that breaking this massive project into smaller, more achievable tasks is the only way to go. This simple four-step process provides a clear roadmap from start to finish.
| Phase | Action | Key Benefit |
|---|---|---|
| Collect | Gather all your photos from every device and account. | Creates a complete inventory in one place. |
| Consolidate | Transfer everything to a single, central hub (like an external hard drive). | Eliminates scattered files and prevents duplicates. |
| Categorize | Create a logical folder structure and naming system. | Makes finding any photo quick and intuitive. |
| Continue | Set up a routine for backups and ongoing maintenance. | Ensures your system stays organized long-term. |
This "Four C's" framework turns an intimidating chore into a straightforward process. By focusing on one phase at a time, you can steadily build an organized library without the usual stress.
Here’s a great visual that breaks down the foundational steps.
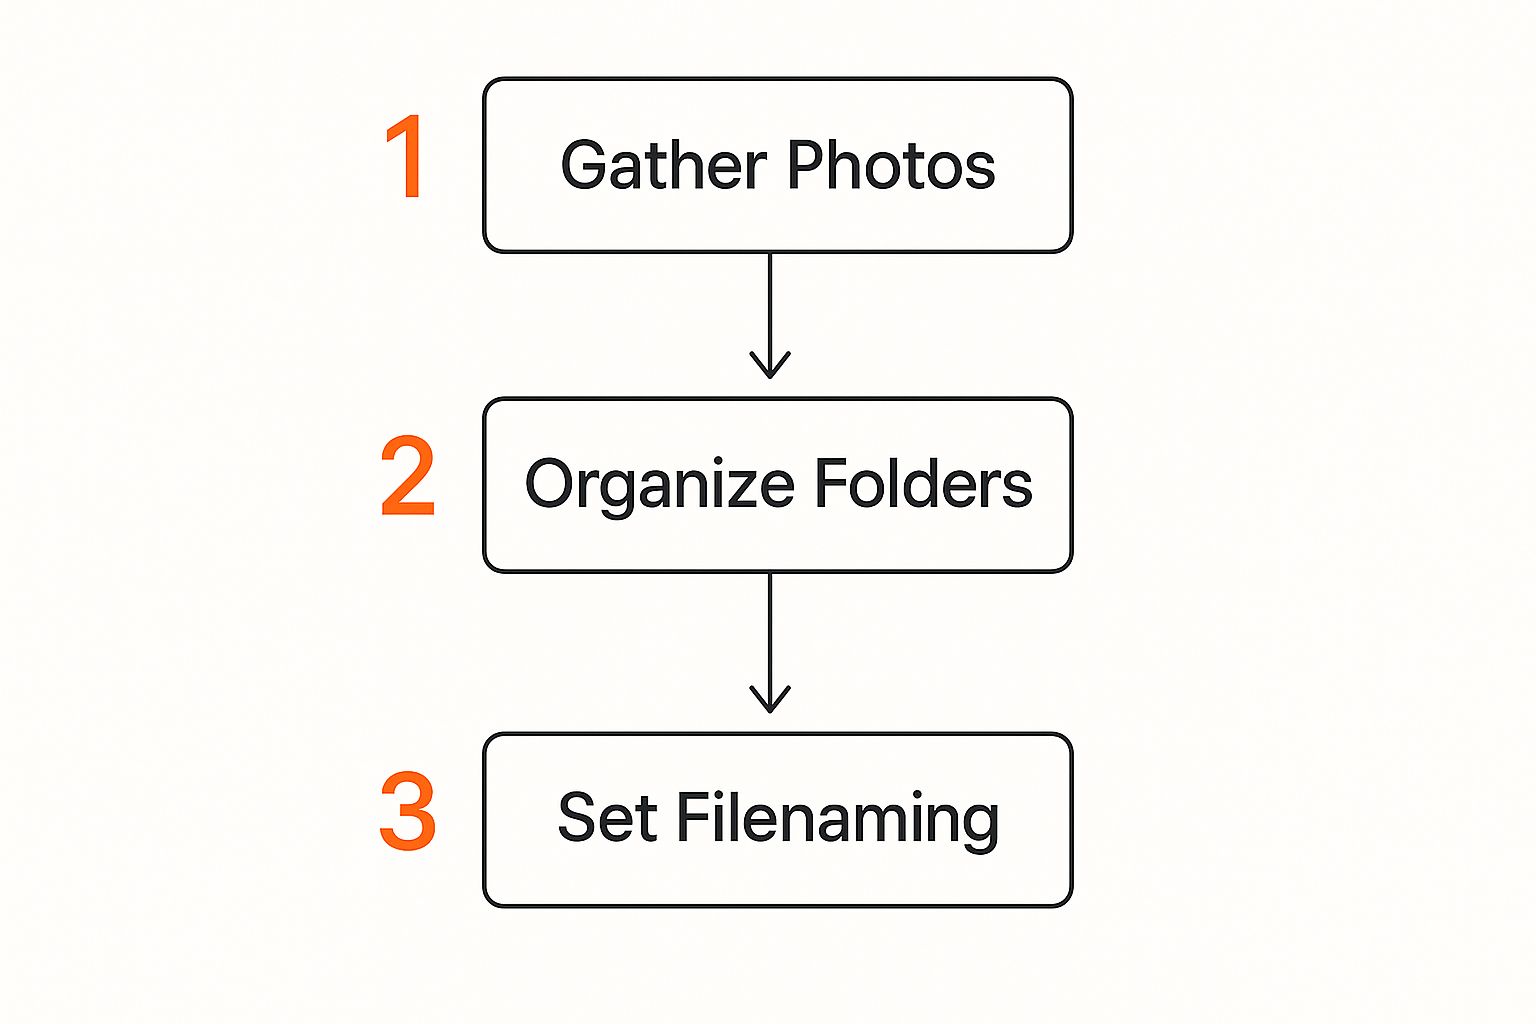
As you can see, a successful system is built in layers. You have to start with collection before you can even think about the fun stuff, like creating folders and renaming files.
Effortless Collection for Events
One of the biggest headaches today is rounding up photos after an event. Who really wants to spend weeks chasing down guests for their pictures from a wedding, birthday party, or company retreat? It's tedious, and half the time, it doesn't even work.
This is where simple, modern tools completely change the game.
Imagine a system where guests can instantly upload their photos to a shared gallery just by scanning a QR code. No app downloads, no account sign-ups, and absolutely zero friction.
This is exactly what tools like WedPicsQR were built for. This method provides a seamless way to consolidate photos from everyone at your event. For a practical example, you can display your event’s QR code at the venue entrance or on invitations for instant photo uploads.
While the primary focus is often weddings, this incredibly easy-to-use approach is versatile enough for any gathering:
- Birthday Parties: Capture every candid moment from all your friends and family without having to ask.
- Corporate Gatherings: Easily pull together photos from team-building events, conferences, or holiday parties.
- Family Reunions: Create a single, shared album that everyone can contribute to in real-time, no matter their tech skills.
By making it ridiculously easy for everyone to share their photos, you guarantee that no memory gets left behind. This kind of seamless consolidation is the first—and most important—step toward building a beautifully organized photo library you'll treasure for years.
Choosing Your Digital Photo Hub
Okay, you've wrangled all your photos into one spot. Now for the big question: where will they live permanently? This is your "digital photo hub," the foundation for your entire system. You've got two main paths—local storage (think external hard drives) or a cloud-based service.
Each has its own real-world trade-offs when it comes to access, cost, and security. Getting this right means your memories are not just safe, but actually easy to find and enjoy for years.
The Cloud Storage Advantage
Cloud services have totally changed the game for photo organization. The ability to pull up your entire library from any device, anywhere, is a massive win for most people. Platforms like Google Photos, Apple iCloud, and Dropbox handle all the technical heavy lifting, offering features that make maintenance practically nonexistent.
The shift to the cloud is huge. By 2025, it's estimated that 2.3 billion people will use personal cloud storage. Services like Google Drive are already used by 94% of people who store their photos online. This isn't surprising, given how many photos we all take and how powerful the AI-driven features have become. You can read the full analysis on cloud storage trends to see just how fast these services are growing.
The real magic is the artificial intelligence. Many of these services automatically tag photos, recognizing faces, places, and even objects. This means you can search your library for "beach trip 2023" or "Aunt Carol" and get instant, scarily accurate results without ever having tagged a single photo yourself.
Key Takeaway: Cloud storage is king for accessibility and automated organization. If you love seamless syncing across your devices and want powerful search tools, a cloud-based hub is almost certainly your best bet.
Local Storage for Total Control
On the flip side, local storage—like an external hard drive or a Network Attached Storage (NAS) device—gives you complete, hands-on control. Your files are yours, period. You’re not paying a subscription or depending on an internet connection to see your own memories.
This route usually means a one-time cost for the hardware instead of a recurring monthly fee, which can save you a lot of money over time. And if you’re concerned about privacy, nothing beats the security of keeping your photos on a physical drive that you own and control.
But that control comes with responsibility. You’re the one in charge of managing the hardware, running your own backups, and making sure the drive is safe from drops, spills, or simple failure. It's a more hands-on approach, perfect for people who are comfortable managing their own tech.
Making the Right Choice for You
This isn't about which option is "better." It's about what fits your life, your budget, and how much you want to tinker with technology.
- Choose Cloud Storage if: You want easy access from your phone, laptop, and tablet. You love the idea of AI doing the organizing for you and prefer a hands-off approach to backups.
- Choose Local Storage if: You want total control over your files, would rather buy hardware once than pay a monthly fee, and are diligent enough to manage your own backup routine.
Honestly, a lot of people land somewhere in the middle. A hybrid approach gives you the best of both worlds. You can use a local hard drive as your main, bomb-proof archive while syncing your favorite, most-viewed photos to the cloud. That way, you get robust security and everyday convenience.
Creating a Folder System That Actually Works
We’ve all seen it: a desktop drowning in files named 'IMG_1234.jpg'. It’s a digital headache just waiting to happen. The secret to organizing your photos isn't some crazy complex system, but a simple, logical structure you can actually stick with for years.
Let's build one that ends the search frustration for good.
The most future-proof method I’ve found is a chronological system. Why? Because you’ll always remember when a photo was taken, even if you forget the specific event or who was in it. This creates an intuitive timeline of your life that anyone can understand without needing a manual.
Start with a Chronological Folder Structure
Your main "Photos" folder is the mothership. Inside, create a folder for each year. This immediately breaks your entire library down into manageable chunks.
From there, the structure is simple and scales beautifully. The path should look something like this: Year > Month > Event.
- 2024
- 01-January
- 02-February
- 2024-02-14_Valentines-Day
- 03-March
- 04-April
- 2024-04-21_Spring-Hike
- 2024-04-28_Saras-Birthday
Here’s a small trick that makes a huge difference: number the month folders (like "01-January"). This forces them to appear in the correct chronological order, not alphabetically. It makes navigating your archive incredibly fast.
While this structure is perfect for personal collections, you might need something different for bigger family archives. We cover more options in our guide on how to organize family photos.
Establish a Smart File Naming Convention
Once your folders are in order, it's time to tackle the files themselves. A consistent naming convention makes your photos searchable even outside of a fancy program. You can find any image with a simple search on your computer, no app needed.
The best formula I've landed on is clear, descriptive, and chronological: YYYY-MM-DD_Event-Name_001.jpg
Let’s break that down:
- YYYY-MM-DD: The full date the photo was taken. This keeps everything sorted.
- Event-Name: A short, descriptive name for the event (e.g., "Mexico-Vacation," "Family-BBQ").
- 001: A sequential number to keep photos in the order they were shot.
In practice, a file would look like 2024-07-04_Summer-Cookout_057.jpg. Now, every single photo contains its own essential data right in the file name.
Before you start organizing, it's helpful to see a few different approaches laid out. Some people prefer simplicity, while others need more detail for professional work.
Folder Structure and Naming Convention Examples
This table compares a few popular methods for organizing folders and files.
| Method | Example | Best For |
|---|---|---|
| Chronological (Simple) | /2024/2024-08_Summer-Vacation/IMG_01.jpg | Personal photo collections, simplicity, and ease of browsing. |
| Chronological (Detailed) | /2024/08-August/2024-08-15_Beach-Day/ | Detailed personal archives, genealogists, family historians. |
| Event-Based | /Events/Weddings/Smith-Jones-Wedding/ | Event photographers, businesses, project-based work. |
| Client-Based | /Clients/Acme-Corp/2024-Product-Shoot/ | Freelance photographers, agencies, and client-focused projects. |
Ultimately, the "best" system is the one you will consistently use. For most people, the detailed chronological method offers the best balance of organization and ease of use.
Renaming thousands of photos sounds like a total nightmare, but it doesn't have to be. Free batch-renaming tools can chew through your entire library in minutes, applying your new naming convention to thousands of files at once.
Batch-Rename Your Photos for Free
Manually renaming each photo is out of the question. Thankfully, there are powerful, free tools that can do all the heavy lifting for you. These applications read the photo's metadata (the hidden data like date and time) and use it to rename files automatically based on your formula.
Here are a few solid options I've used over the years:
- Bulk Rename Utility (Windows): Incredibly powerful and a bit intimidating at first, but it offers near-limitless options for renaming files based on metadata.
- NameChanger (Mac): A straightforward and user-friendly app that makes batch renaming incredibly simple with its intuitive interface.
- Adobe Bridge (Windows/Mac): A professional-grade digital asset manager from Adobe that's free to use and includes a robust batch-renaming feature.
Spending an hour setting up a batch-rename process will save you countless hours of frustrated searching later. By combining a logical folder structure with a smart file naming system, you create a self-organizing archive that will actually stand the test of time.
Effortlessly Collect Event Photos with QR Codes
Getting your existing photo library in order is one thing, but what about the constant flood of new pictures from every event? Chasing down photos from guests after a wedding or party has become a modern-day nightmare. You text, you email, you post on social media... and you still only get a fraction of the moments people captured.
The old way is just broken. It creates a whole new digital mess before you've even had a chance to organize the last one. But there’s a ridiculously simple way to pull in every single photo taken at your event, making sure no memory gets left behind.

The Magic of Instant, App-Free Uploads
Imagine a unique QR code made just for your celebration. Guests simply scan it with their phones and can instantly upload their photos to a single, shared gallery. No apps to download. No accounts to create. No confusing instructions. This ease of use is what makes seamless consolidation of photos possible.
When sharing is that easy, people actually do it. The process is so direct that anyone, no matter how tech-savvy (or not), can add their photos in seconds. It is, hands down, the easiest way to gather every candid shot and unique perspective from your special day.
This method turns every guest into a potential photographer, seamlessly pulling hundreds of photos into one private gallery without you having to lift a finger. It’s about making photo collection an effortless part of the experience, not a post-event chore.
For a deeper dive, our guide on how to collect wedding guest photos offers more strategies to get the most out of your shared gallery.
A Versatile Solution for Any Gathering
While this system is a game-changer for its primary focus—weddings—its real power is in its versatility. It's perfect for a huge range of events because the core idea is the same: make it ridiculously simple for people to share their pictures in real time.
Think about these real-world examples:
- Weddings: This is the big one. Place QR codes on welcome signs, cocktail napkins, or table centerpieces. Guests can upload everything from the ceremony to the reception, creating a living album of your day as it happens.
- Corporate Gatherings: At a company conference or holiday party, putting the QR code on presentation slides or event programs ensures all the professional—and fun—moments are captured for company newsletters or social media.
- Birthdays and Reunions: For a milestone birthday or family reunion, include the QR code right on the invitation. Guests will know how to share photos before they even arrive, capturing moments from start to finish.
- Community Events: From charity runs to school festivals, QR codes give all attendees a central hub to contribute, creating a comprehensive visual record of the day.
You can display your event’s QR code at the venue entrance or on invitations for instant photo uploads. This proactive approach gets everyone involved right from the beginning. By removing every single barrier to sharing, you guarantee a richer, more complete collection of memories, perfectly organized from the moment they’re taken.
Building a Bulletproof Backup Strategy
Having a perfectly organized photo library is a huge win, but what's the point if a single hard drive crash erases everything? Building a backup strategy might sound technical, but the core idea is simple: create copies to protect your priceless memories.
The gold standard here is the 3-2-1 backup rule. It’s a straightforward framework used by everyone from casual photographers to IT pros, and it’s the best way to get peace of mind knowing your photos are safe from pretty much any disaster.
Understanding the 3-2-1 Rule
The rule is easy to remember and even easier to put into practice. It’s all about making sure no single point of failure can wipe out your entire collection. For a truly solid backup, it's also smart to think about bigger-picture security, like what’s covered in a good data security checklist.
Here’s the breakdown:
- Three Copies: Keep at least three copies of your data. This means your main library and two separate backups.
- Two Different Media Types: Store your copies on at least two different types of storage. Don't just rely on two external hard drives; they can fail in the same way.
- One Copy Off-Site: Make sure at least one of these copies is stored in a completely different physical location.
This strategy protects you from just about anything. A local hard drive crash? Your second local copy has you covered. A house fire or theft that takes out both local copies? That’s what your off-site backup is for. It’s the ultimate safety net.
Creating Your Backup System in the Real World
Let's translate this rule into a simple, actionable setup. For most people, the best combination is an external hard drive paired with a cloud service.
Your Primary Copy: This is the photo library on your computer or main external drive—the one you actively manage day-to-day.
Your First Backup (Local): An external hard drive is perfect for this. Just plug it in weekly or monthly to drag and drop a copy of your entire photo library. This is your quick-and-easy recovery option if your computer gives up the ghost.
Your Second Backup (Off-Site): A cloud backup service is the easiest way to get your files off-site. Services like Backblaze, Carbonite, or even Dropbox can automatically sync your photo folders to the cloud. If something happens to your home and all your local devices, this off-site copy ensures your memories survive.
Once you know your photos are safe, the next step is actually enjoying them. For some great ideas on that, check out our post on the best ways for how to share photo albums with your friends and family.
Let Smart Tools Do the Organizing for You
Getting your folders and file names in order is a fantastic foundation, but let's be honest—technology can do most of the heavy lifting. Modern photo management software is incredibly smart, using metadata and AI to automate tasks that used to take forever. This means you can keep your system pristine with way less effort.
Every single photo you take has a hidden layer of information called metadata. This includes the basics like date and time, but also camera settings and often the GPS location where you snapped the shot. Smart software reads this data and can automatically sort your pictures by date or even plot them on a map without you lifting a finger.
The Magic of AI in Photo Management
Where these new tools really flex their muscles is with artificial intelligence. This isn't just about reading basic data; it's about understanding what's in your photos. The demand for smarter solutions is huge. The global digital photography market was valued at $55.6 billion in 2023 and is on track to hit $87.3 billion by 2032, largely because we all need better ways to manage our massive photo collections. You can dive deeper into the digital photography market stats at dataintelo.com.
AI-powered features can completely change how you find your favorite memories. Two of the most game-changing tools are facial and object recognition.
-
Facial Recognition: This tech is brilliant. It scans your photos to identify people. Once you tag your mom or your best friend a few times, the software learns their face and automatically groups every photo they appear in. No more manual sorting.
-
Object Recognition: This is basically a search engine for your personal photo library. The AI identifies objects and scenes, letting you search for terms like "beach," "dog," or "birthday cake." Instantly, every relevant photo you've ever taken pops up.
Think of it this way: AI handles the tedious tagging and sorting, so you can find a specific moment in seconds. It’s like having a personal photo assistant with a perfect memory, and it doesn't rely on you remembering which folder you put something in.
How to Use Smart Tools in Your Workflow
Bringing these tools into your life doesn’t mean you have to ditch your folder system. In fact, they work best together, creating a powerful, layered organization strategy. You can keep your neat, chronological folders as your main archive while using AI-driven search for quick, day-to-day access.
For example, services like Google Photos, Apple Photos, and Adobe Lightroom all pack some serious AI power. They can spot blurry or duplicate images and suggest deleting them, create highlight reels from your vacation, and even surface old memories you'd forgotten about.
By letting these smart tools handle the boring stuff, you free up more time to actually enjoy your photos. This blend of a logical structure and intelligent software is the real secret to finally conquering your digital photo clutter for good.
Common Photo Organization Questions
Even with the perfect organizational system planned out, you're bound to hit a few snags. It happens to everyone. Let's walk through some of the most common questions that pop up once you actually start sorting, from dealing with those pesky duplicates to finally getting your old printed photos into the digital age.
Getting these little details right is what separates a decent photo library from a truly unified, future-proof one.
How Should I Handle Duplicate Photos?
The quickest way to tackle duplicates is with a dedicated finder tool. Many photo management apps have this feature built right in, scanning for both identical files and images that are just visually similar.
My advice? Always, always review the suggested duplicates before you hit that delete button. You don't want to accidentally toss a slightly better version of a once-in-a-lifetime shot.
Should I Organize Videos with My Photos?
Yes, absolutely. For the sake of having a single, cohesive timeline, you should store your video files right alongside your photos using the same chronological folder structure.
For example, a video from a birthday party should live in the 2024 > 08-August > 2024-08-15_Birthday-Party folder, right next to all the pictures from that day. This keeps all the media from an event together in one place.
What Is the Best Way to Digitize Old Photos?
To bring your old physical photos into your digital library, a high-quality scanner is your best friend. But scanning is only half the battle.
The most critical step is to edit the file's metadata to reflect the original date the photo was taken, not the date you scanned it. This is the secret to making sure it files correctly into your chronological system, just like any other digital image.
For those who shoot a high volume of photos for work, like real estate, improving your initial capture process can make organizing much easier down the road. You might want to check out these essential real estate photography tips to streamline your workflow from the very beginning.
The end goal is to create a single, seamless timeline of your life. By treating scanned photos and videos just like your digital-native images, you build a complete archive where every memory has its proper place.
This consistent approach helps you avoid the common mistake of having separate, disconnected libraries for different types of media, which only makes finding what you're looking for a headache later on.
Ready to effortlessly collect every photo from your next big event? With WedPicsQR, guests can instantly upload their pictures to a shared gallery with a simple QR code scan—no app required. Perfect for weddings, corporate events, reunions, and birthdays. Create your free gallery and see how easy it is at https://www.wedpicsqr.com.