How to Organize Family Photos Easily and Effectively
Organizing family photos is all about creating a simple, repeatable workflow to gather, cull, sort, and back up every digital image you own. The best way to tackle this is to consolidate all your photos into one central place, pick the best shots, build a logical folder structure, and set up a reliable backup system. This is how you turn a chaotic digital mess into a treasured, easy-to-use library of memories.
From Digital Chaos to Cherished Memories
If you feel like you're drowning in a sea of digital photos scattered across phones, old laptops, and random cloud accounts, you're not alone. The jump to digital photography turned us all into family historians, but it also created a massive organizational headache. This guide is your lifeline—it’ll help you get past the overwhelm and create a system that actually works and is easy to stick with.
This isn’t just about tidying up a folder. It's about taking back your family’s story and making your most precious moments easy to find, share, and enjoy for years to come. It’s about making sure those memories are safe and always accessible. If you want to dive even deeper, check out this ultimate guide to preserving digital and print memories that covers all kinds of storage techniques.
The Modern Photo Overload
The scale of this problem is just staggering. The average family now has over 250,000 digital photos, a huge jump from just seven years ago. Once digital cameras got rid of the cost of film, the floodgates opened, and we started snapping pictures of everything.
Photo organizing pros have seen it all. They report that more than 50% of these photos are duplicates, and they often end up deleting over 75% of a client’s collection just to get down to the best shots. That might sound extreme, but the result is pure relief and a renewed ability to actually enjoy the memories that matter.
This photo explosion created both an opportunity and a challenge, making smart tools practically a necessity.
The real goal isn't just to store photos. It's to create a living archive that you and your family can easily navigate and celebrate. By focusing on quality over quantity, you make every single photo count.
The Solution for Shared Moments
A huge part of today's photo chaos comes from trying to collect pictures after shared events. Think about the last wedding, birthday party, or family reunion you went to. Photos end up scattered across dozens of different phones, get shared randomly in group texts, or worse, never get shared at all.
This is where modern tools make a world of difference.
Imagine this: you display a simple QR code at the entrance to your event or right on the invitations. Guests just scan it with their phone's camera, and a webpage pops up—no app download required. From there, they can immediately upload their photos directly to a central, private gallery for that event.
This kind of seamless consolidation is a game-changer. While primarily focused on weddings, this effortless method is versatile enough for any get-together:
- Weddings: Capture every candid, funny, and touching moment from your guests' point of view.
- Birthdays: Effortlessly gather all the photos from your friends and family in one spot.
- Corporate Gatherings: Consolidate team photos without having to chase down a hundred different emails.
- Reunions: Create a complete visual story of your time together, with pictures from everyone.
This approach flips photo collection from a chore into a simple, real-time activity, ensuring no memory ever gets left behind on someone else’s phone.
Creating Your Central Photo Hub
Before you can organize anything, you have to get it all in one place. This is the first, most crucial step. Think about it: you’ve got photos scattered across phones, old laptops, random USB drives in a junk drawer, and probably a few dusty social media accounts. The goal is to corral every single one of them into a single, reliable hub—the foundation of your entire photo library.
I know, it sounds like a massive job, but you don't have to do it all in one weekend. Just start by making a list of every place your photos might be hiding. That old Dell laptop in the closet? Add it to the list. Your partner's phone? On the list. That Facebook album from 2011? You get the idea. A simple checklist keeps you from missing anything.
Choosing Your Hub Foundation
So, where does everything go? Your central hub can be a physical device, a cloud service, or—my personal favorite—a mix of both. Each option has its own trade-offs, and what works for one family might not work for another.
For example, an external hard drive is great because you buy it once and it's yours. Your data is physically in your house, which gives a lot of people peace of mind. On the other hand, a cloud service like Google Photos or Dropbox lets you access your pictures from anywhere and protects you if your hard drive fails or gets lost.
Honestly, a hybrid approach is usually the sweet spot. Use a cloud service for day-to-day access and easy sharing with family, and keep a physical hard drive as a rock-solid backup.
The best system is one you will actually use. Don't overcomplicate it. Choose a central hub that fits your lifestyle, whether it's the simplicity of a cloud service or the tangible security of a hard drive.
To help you decide, here's a quick breakdown of the main options.
Choosing Your Central Photo Hub
A comparison of the primary methods for consolidating your family photos, helping you choose the best fit for your needs and technical comfort level.
| Method | Best For | Pros | Cons |
|---|---|---|---|
| External Hard Drive | Tangible, one-time purchase and local control over your data. | - No subscription fees - Fast transfer speeds - Full privacy control | - Vulnerable to physical damage or loss - Requires manual backups - Not easily accessible on the go |
| Cloud Storage | Easy access from any device, automatic backups, and simple sharing. | - Access photos anywhere - Protects against hardware failure - Automatic syncing and uploads | - Requires ongoing subscription fees - Slower uploads on weak internet - Privacy concerns for some |
| Hybrid Approach | The security of a physical backup combined with the convenience of the cloud. | - Best of both worlds - Redundant protection - Flexible access and sharing | - Can be more expensive - Requires managing two systems |
Ultimately, the right choice depends on your budget, how you want to access your photos, and your comfort level with technology. The hybrid model offers the most robust protection, but even just picking one and sticking with it is a huge step forward.
Modern Tools for Effortless Photo Gathering
Okay, so consolidating your existing photos is one thing. But what about all the new pictures you take at every family event? This is where a few modern tools can completely change the game, helping you organize in real-time. Instead of spending weeks chasing people down for their photos after a birthday party, you can get them instantly.
A simple QR code system is a fantastic solution for any big get-together. While this tech has a primary focus on weddings (where you absolutely want every guest’s candid shot), its versatility makes it perfect for any family occasion.
- Weddings: Seamlessly collect candid moments from every guest, creating a complete and authentic album of your special day.
- Family Reunions: Instantly build a shared gallery that every family member can contribute to and enjoy.
- Corporate Events: Effortlessly consolidate photos from team-building activities or conferences without managing countless emails.
- Birthday Parties: Ensure you get every shot from every angle, all gathered in one private album.
The beauty of this is its ease of use. You create a unique QR code for your event, and guests just scan it with their phones. It immediately opens an upload page right in their browser. There is absolutely no app to download and no account to create, which removes all the usual friction that stops people from sharing.
For instance, you can display your event’s QR code at the venue entrance or on invitations for instant photo uploads. It's a tiny bit of prep that ensures as moments happen, the photos are flowing directly into your central hub, capturing the full story of your celebration from everyone's point of view.
Curating Your Collection for Quality
Alright, now that you've corralled all your photos into one central spot, it's time for the real work to begin: curation. This isn't about being ruthless and deleting memories. It’s about being an editor. The goal is to trim the fat, so the best moments can really shine.
Think of it this way: you’re transforming a giant, chaotic digital shoebox into a beautifully curated gallery that tells your family's story. That means finally letting go of the blurry shots, the accidental photos of the inside of your pocket, and the ten near-identical takes of the same exact smile. Quality over quantity makes the entire collection infinitely more valuable.
Start with the Obvious Wins
The easiest place to start? Duplicates. We’re all guilty of it. With digital cameras and smartphones, it's just so easy to end up with multiple copies of the same shot. Getting rid of these is a simple, high-impact first move that instantly clears up space and reduces the noise.
Remember, curating isn't about losing memories. It’s about making the best ones easier to find and enjoy. A smaller, well-organized collection is far more valuable than a vast, chaotic one.
You don't have to hunt these down one by one, either. There are plenty of great software tools out there that can automatically sniff out and flag duplicate or strikingly similar files, saving you hours of tedious work. If you need a hand with that, our guide on how to remove duplicate photos walks you through the practical steps. Trust me, automation is a game-changer here, especially if you have tens of thousands of pictures.
Adopt a Quality-Over-Quantity Mindset
Let’s be honest, our modern habit of snapping pictures of everything creates a massive organizational headache. The average family takes over 1,500 photos a year! It’s no wonder things pile up. In fact, some studies show that a staggering 85% of family photos are never systematically organized, which is why so many of us feel completely overwhelmed. This firehose of images is precisely why curating is non-negotiable for any long-term system.
To keep from getting burned out, the trick is to break this task down into small, manageable chunks.
- Tackle One Event at a Time: Don't try to boil the ocean. Just focus on one folder, like "Summer Vacation 2023," and get it done.
- Set a Timer: Seriously. Dedicate just 20-30 minutes to a session. Short, consistent bursts are way more effective than trying to pull an all-nighter sorting photos.
- The "Best Of" Rule: When you find a series of similar shots, pick the one undisputed winner—the one where everyone's eyes are open and the focus is sharp. Keep that one, and be okay with letting the others go.
This methodical approach makes the whole process feel less like a chore and helps you build momentum. Before you know it, you'll have a curated collection that not only frees up storage space but, more importantly, truly represents your most cherished memories.
Building an Intuitive Digital Library
Alright, you've gathered and sorted your photos. Now comes the fun part: creating a digital library that actually makes sense. We're not talking about complicated software or crazy databases. This is about building a simple, chronological folder system that anyone in the family can navigate without a second thought. Get this right, and you can say goodbye to endless scrolling and hello to finding the exact memory you want in seconds.
The bedrock of this whole system is a main folder for each year. Inside those, you’ll drop in subfolders for specific months or, even better, for individual events. This simple habit turns a digital junk drawer into a browsable timeline of your life. Before you dive in, it’s a good idea to get a handle on your storage needs—both now and for the future. For a little more help on that, this guide on understanding your overall storage capacity needs is pretty useful.
Master Your Folder Structure
Consistency is everything here. If you set up a clear hierarchy from the get-go, you'll have a system that scales perfectly as your photo collection explodes over the years.
Here’s a dead-simple structure that just works:
- Top-Level Folder: Kick things off with one main folder. Call it "Family Photos" or something similar.
- Year Folders: Inside that, create a folder for each year (e.g., "2023," "2024").
- Event Subfolders: Within each year, create folders for events using a "YYYY-MM Event Name" format. This little trick forces your computer to sort them chronologically for you.
For example, a photo's home might look like this: Family Photos > 2024 > 2024-07 Summer Vacation. It's intuitive, clean, and makes sure every single photo has a place to live.
Adopt a Smart File Naming Convention
A logical folder structure is only half the battle. The real magic happens when you rename your actual photo files. This is what turns your collection from a simple gallery into a powerfully searchable archive. Let's be honest, a file named "IMG_5821.jpg" tells you nothing. A descriptive name, on the other hand, gives you instant context.
I recommend a naming convention like YYYY-MM-DD_Event_###.jpg. Here's the breakdown:
- YYYY-MM-DD: The full date the photo was taken.
- Event: A short, descriptive name for what's happening (e.g., "BeachDay," "ChristmasEve").
- ###: A sequential number (001, 002, 003) to keep the photos in the right order.
A final file name looks like this: 2024-07-15_BeachDay_001.jpg. And don't worry, you don't have to do this one by one. Most operating systems and photo programs let you batch-rename files, which makes this process way faster than it sounds. Now you can just search your computer for "2024-07" and instantly pull up every picture from that month.
Don't try to get this perfect on day one. Just start with the current year and chip away at the older stuff when you have a spare moment. The goal is progress, not a stressful, all-night overhaul of your entire photo history.
The Power of Tags and Metadata
Want to take your organization to the next level? Start using tags. This adds an extra layer of searchability that folders alone can't provide. Most photo management software—including the default apps on both Windows and Mac—lets you add keywords or "tags" to your photos without messing with the file name.
This is where you can add all the little details that matter:
- People: Tag photos with names like "Grandma" or "Leo."
- Places: Add location tags like "Hawaii" or "City Park."
- Activities: Use descriptive tags for what you were doing, like "Hiking," "Swimming," or "Baking."
Once you've done this, you can run incredibly powerful searches. Think "Show me all photos of Leo from Hawaii" or "Find every picture from Christmas Eve." This final touch completes your library, making every single cherished memory findable in an instant.
Implementing a Foolproof Backup Strategy
An organized photo library is only as good as its protection plan. After all the hard work you’ve put into curating and sorting your family’s history, the last thing you want is for a digital disaster to wipe it all away. This is where a rock-solid backup strategy comes in, and the gold standard is the “3-2-1 Rule.”
It’s a simple but incredibly powerful method for making sure your memories can survive pretty much anything—hardware failures, accidents, even theft.
The concept is easy: keep three separate copies of your photos, store them on two different types of media, and make sure one of those copies is stored off-site. It might sound a bit technical, but in practice, it’s a straightforward plan that buys you priceless peace of mind.
Your Real-World 3-2-1 Plan
So, how do we translate this rule into a simple setup that anyone can actually manage? The whole point is redundancy, making sure that if one copy of your photos disappears, you have others ready to take its place.
Here’s a practical way to put it into action:
- Copy 1: The Primary Library. This is the master collection you’ve just organized, living right on your main computer’s internal hard drive. It's your "daily driver," the one you'll access most often.
- Copy 2: The Local Backup. This second copy needs to live on a different type of media. An external hard drive is perfect for this. You can find affordable multi-terabyte drives online that will do the job beautifully.
- Copy 3: The Off-Site Backup. Your third copy must be physically separate from the other two. A secure cloud service is the ideal solution here. Think Google Photos, Dropbox, or a dedicated backup service like Backblaze.
This simple infographic breaks down the ongoing maintenance needed to keep your new library and its backups in perfect sync.
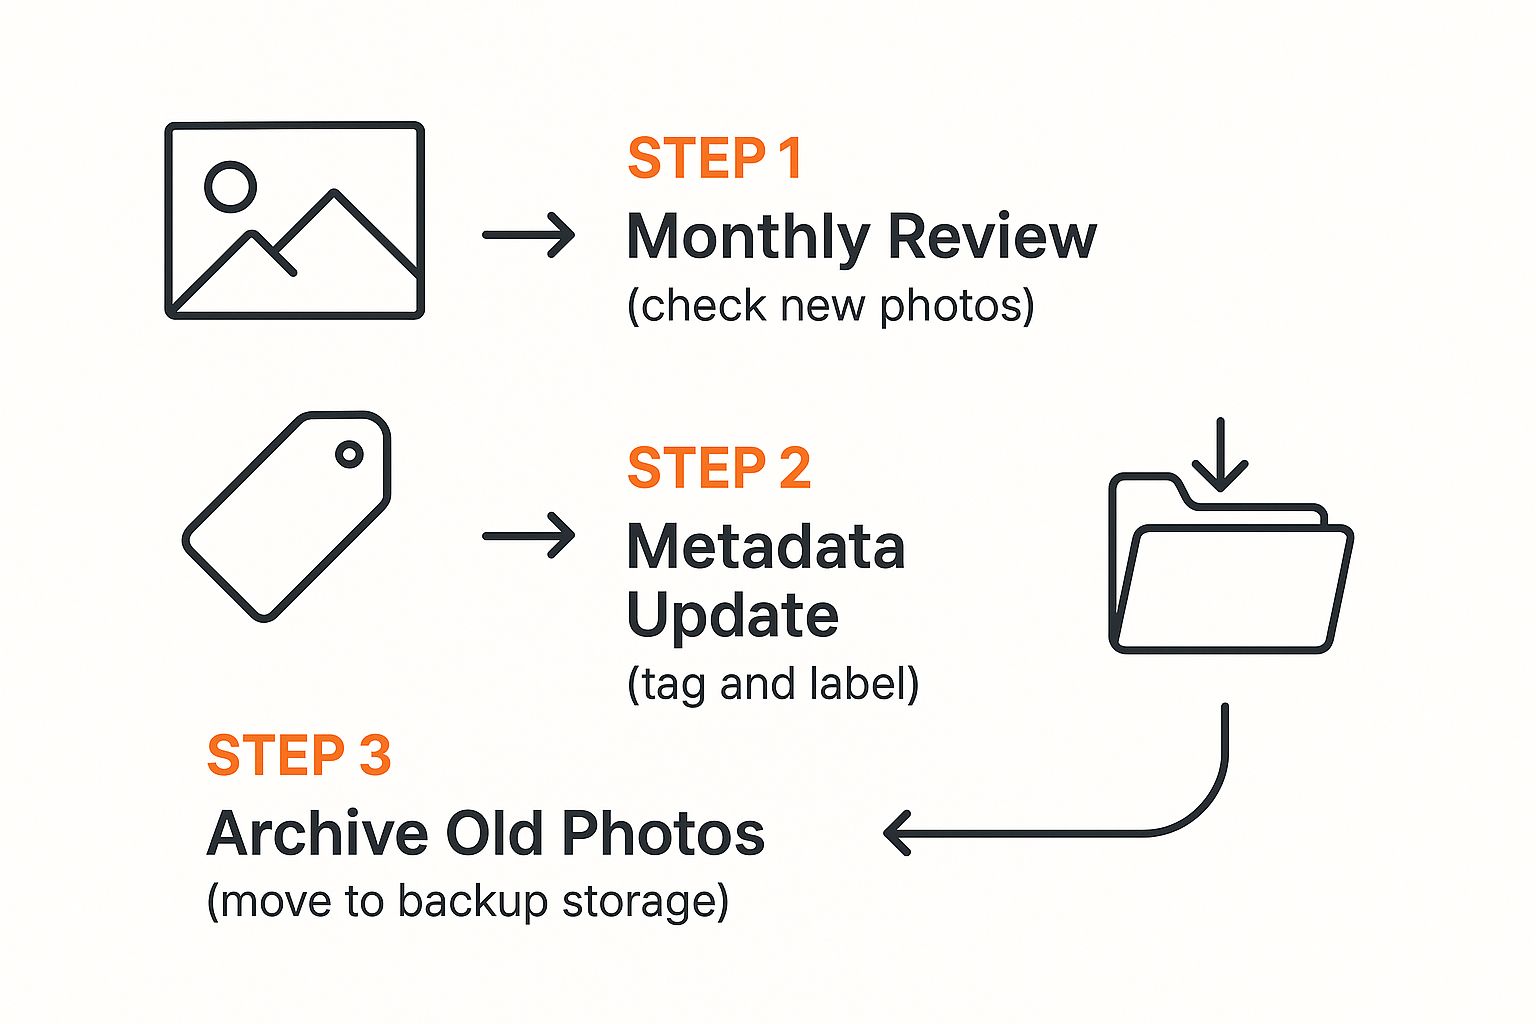
As the visual shows, a simple, recurring workflow—reviewing, tagging, and archiving—is the real key to long-term success.
For those truly irreplaceable physical items, like old photo albums or film negatives, some people go a step further. If you're considering this, it's helpful to know the essential tips for choosing a self-storage unit to keep them safe from damage.
Automating for Total Peace of Mind
The sheer number of photos we take these days makes an efficient system non-negotiable. Worldwide, it's estimated that 2.1 trillion photos will be snapped in 2025—a huge jump from just 660 billion a decade ago. It’s a universal challenge.
Manually backing up your photos is a recipe for forgetting. The best backup strategy is one that runs on its own, protecting your memories without you having to think about it.
Thankfully, you don’t have to remember to do this yourself. Most operating systems come with built-in tools (like Time Machine on a Mac or File History on Windows) that can automatically back up your computer to an external drive.
Likewise, cloud services offer desktop apps that sync your photo folders in the background. Set them up once, and your photos are continuously protected. This is the crucial final step in getting your family photos truly organized and secure.
And to make the whole process smoother from the start, especially after big events, you can learn how to https://www.wedpicsqr.com/blog/collect-wedding-guest-photos into one place before you even begin sorting.
Your Photo Organization Questions Answered
As you start sorting through years of family photos, you're bound to hit a few roadblocks. It happens to everyone. Think of this as your personal FAQ for getting past those common hurdles so you can keep your momentum going.
How Should I Handle Photos from a Big Event Like a Wedding?
Big events mean photos from dozens, sometimes hundreds, of different people. Trying to collect them all used to be a nightmare of texting, emailing, and chasing people down. The best way I’ve found to handle this is with a QR code-based system. It’s modern, clean, and ridiculously easy.
Here’s how it works: you create a unique QR code for your event, and guests just scan it with their phones. It pops open a direct upload page right in their browser—there's no app to download and no account to sign up for. Their photos land in one central, private gallery instantly. It’s that simple.
While primarily focused on weddings, this effortless approach is versatile enough for all kinds of gatherings:
- Weddings: This is where it really shines. You get to see the day from every angle, capturing all the candid moments you might have missed.
- Birthdays: Finally, one place for all the party pics from friends and family.
- Corporate Gatherings: Consolidate team photos without sending a dozen follow-up emails.
- Family Reunions: Weave together a complete visual story with pictures from every branch of the family tree.
The key is making it effortless for everyone. For instance, you can display your event’s QR code at the venue entrance or on invitations for instant photo uploads. That tiny bit of prep work makes a massive difference in how many photos you’ll actually get back.
How Do I Organize Old Printed Photos?
Bringing your old physical photos into your new digital library is all about one thing: digitization. You can go the high-quality route with a good flatbed scanner or use a handy mobile app like Google PhotoScan for a quick-and-dirty option that’s surprisingly good.
Once they're scanned, treat them exactly like your other digital photos. Rename them using the same convention you've established (like '1985-06-00_FamilyReunion_001.jpg'). Don't know the exact date? No problem. Just use "00" for any unknown month or day. Then, file them into the right year and event folders. This step is what unifies your entire family history, making those cherished old memories just as easy to find as the pictures you took last week.
The real goal here is to create one cohesive timeline. Bringing old photos into your digital system ensures that no part of your family's story gets left behind in a dusty old box.
How Much Time Should I Set Aside for This Project?
Let's be real: the initial organization can feel like climbing a mountain. The secret is to not even try to do it all at once. Break it into bite-sized pieces. Just dedicate 30-60 minutes a day or a few solid hours over the weekend.
A great strategy I always recommend is to start with the most recent year and work your way backward. It feels more rewarding to clear out the new stuff first. Once you've conquered the backlog, keeping it organized is a piece of cake. Seriously. Just set aside 15-20 minutes at the end of each month to sort, delete, and back up that month’s new photos. It’s a small habit that completely prevents the overwhelming clutter from ever coming back.
Once you have your system down, you'll probably start thinking about the best ways for how to share photo albums with the people you love.
Ready to make collecting memories at your next event completely effortless? With WedPicsQR, you can create a custom QR code in minutes for instant, app-free photo uploads from all your guests. Visit https://www.wedpicsqr.com to get started.