How to make a memory slideshow: Create Beautiful Moments in Minutes
Before you even think about digging through old photo albums or scrolling through your camera roll, let's talk about the most important part of making a slideshow that actually connects with people: the story.
Crafting Your Slideshow Story Before Collecting Photos
A great slideshow isn't just a random reel of pictures set to music. It’s a narrative. It needs a clear beginning, a compelling middle, and a satisfying end. Taking the time to map this out first is the secret sauce to creating something that feels cohesive and truly special, not just a jumble of photos.
For a wedding, the story practically writes itself. You can easily build a chronological arc that everyone will love. Start with those early, slightly awkward dating photos, move through the engagement, and finish with a flurry of candid moments leading up to the big day. It’s a natural progression that builds excitement and celebrates the whole journey.
While this approach is perfect for weddings, its versatility makes it ideal for any occasion. For a corporate event, the story could trace a project's evolution, from a rough sketch on a whiteboard to a successful product launch. A 50th birthday slideshow? Highlight the biggest moments from each decade. For a family reunion, you could focus on memories from past gatherings to hit that perfect nostalgic note.
Define Your Central Theme and Tone
First, what's the core idea here? Is this a celebration of love and partnership? A tribute to a long career? A fun, nostalgic look back at a friendship? Nailing down your central theme gives you a clear direction.
Once you have the theme, decide on the tone. Are you aiming for something heartfelt and sentimental that might bring a tear to the eye, or is this more of an upbeat, celebratory vibe that will have people smiling and laughing?
A clear theme and consistent tone are your North Star. They guide every choice you make—from the photos you pick to the music you select and even the transitions you use. This is what keeps the final product from feeling disjointed or confusing.
This simple planning process is the foundation for a slideshow that tells a powerful story.
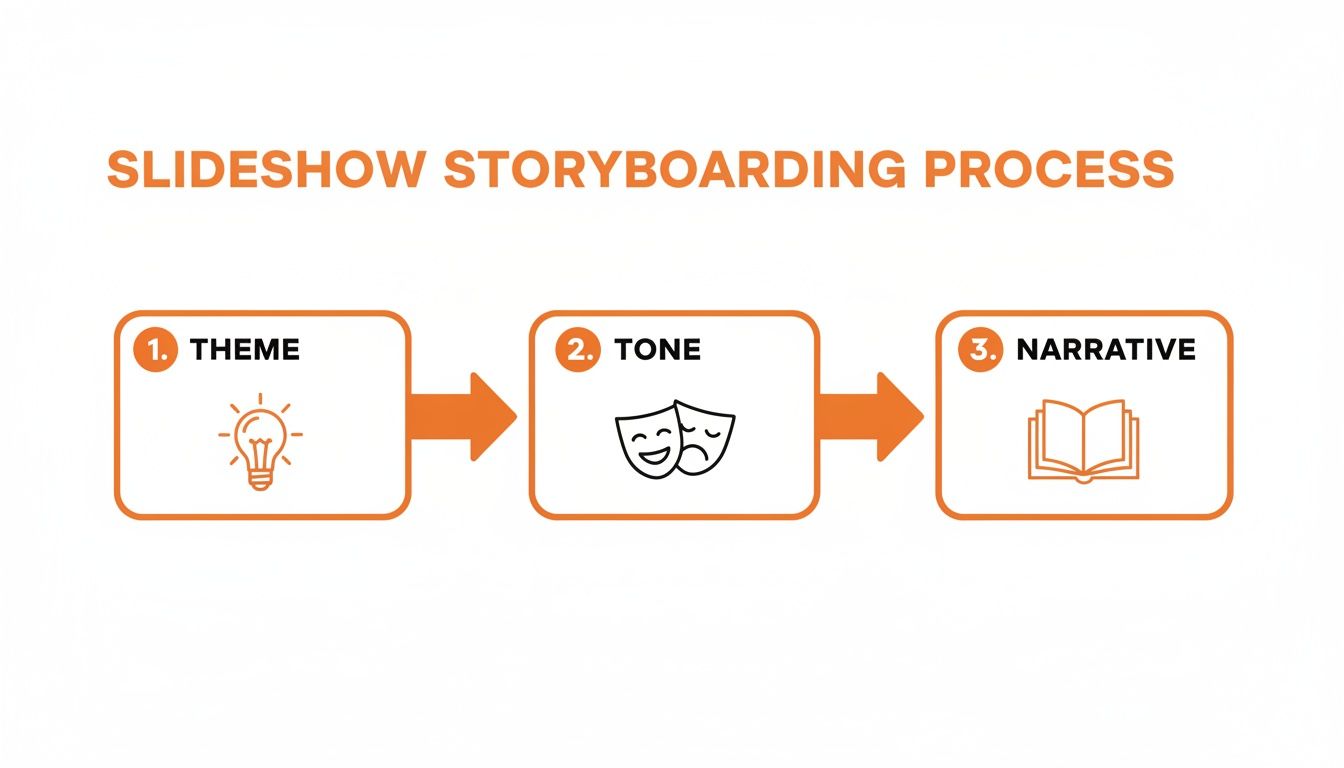
As the visual shows, defining your theme, setting the right tone, and building a narrative are the pillars of a great slideshow. When you plan these elements first, every photo you choose will have a purpose. To really connect with your audience, lean into the art of personal storytelling and turn your memories into a shared experience.
Thinking about the big picture helps, too. The story you tell in your slideshow can be a perfect companion to other keepsakes. For more ideas on preserving these moments, check out our guide on how to create a wedding photo album that beautifully captures your special day at https://www.wedpicsqr.com/blog/create-a-wedding-photo-album.
Gathering Every Candid Moment with QR Codes
Once your storyboard is mapped out, you hit what’s often the most painful part of making a memory slideshow: actually getting the photos. The old way was a nightmare. You'd spend weeks chasing down guests through texts, emails, and social media DMs, trying to stitch together a handful of memories from dozens of different people. It’s slow, frustrating, and you’re guaranteed to miss some of the best shots.
Thankfully, there’s a much better, stress-free way to do this now. Using a simple QR code, you can seamlessly consolidate every photo taken at your event into one central, private gallery. The best part for your guests? There is no app requirement and no complicated logins are needed. They just scan for an instant photo upload and get right back to the celebration. This unbelievable ease of use ensures you capture all those priceless, candid moments the professional photographer might miss.

Making Photo Collection Effortless
The real magic of a QR code system is how seamlessly it fits into your event. Instead of being an afterthought, collecting photos becomes a natural, fun part of the experience for everyone.
By placing your unique QR code in high-traffic areas, you make it impossible for guests to miss. This simple move encourages everyone to contribute their pictures in real-time, capturing the vibe of the event as it’s actually happening.
Here are a few practical examples that work wonders:
- At the venue entrance: Display your event’s QR code at the venue entrance or on invitations for instant photo uploads.
- On event invitations: Include the QR code on your digital or printed invites. This sets the expectation early that you want them to share photos.
- On table place cards or centerpieces: This gives everyone easy access throughout the event, especially during dinner or speeches.
- Near the guest book or gift table: Catch people’s attention in another key area they’re sure to visit.
The goal is to make sharing photos feel like second nature. When there's zero friction—no apps, no sign-ups—guests are far more likely to share the incredible moments they capture on their phones.
Perfect for Weddings and Beyond
While this method is an absolute game-changer for weddings, its incredible versatility works for any gathering where memories are being made. Imagine standing at the altar, knowing that every candid shot your loved ones are taking is funneling directly and instantly into your private gallery. It’s no wonder wedding photo apps have become the new disposable cameras, as couples look for those fun, behind-the-scenes perspectives.
But the same idea applies everywhere else. For a corporate retreat, a QR code can gather awesome shots of team-building exercises and candid networking moments. At a family reunion, it’s the perfect way to collect multi-generational pictures without begging everyone to email their favorites later. The seamless system is also ideal for birthdays, anniversaries, and more.
It all comes down to understanding the power of event QR codes. This system creates a more engaging experience for any occasion and guarantees that every precious memory, from every possible angle, is saved in one convenient place—ready to be woven into your slideshow.
Curating Your Photo Collection for Maximum Impact
Alright, you've gathered a mountain of photos. Now comes the fun part: turning that giant pile of pictures into a story that hits all the right notes. This is where the magic of curation happens. It's less about just picking your favorite shots and more about choosing the right shots to tell the story you planned out earlier.

The goal here is to trim down hundreds (or even thousands) of photos into a tight selection of 100-200 images. This is the sweet spot for a 5-10 minute slideshow—long enough to tell your story, but short enough to keep everyone completely captivated. If you're starting from a chaotic digital mess, learning how to effectively organize digital assets is a great first step to get everything in order before you even begin.
Selecting Photos with Purpose
Every single photo you choose needs to earn its spot. Keep your storyboard nearby and, as you go through your collection, ask yourself: "What does this picture add to the story?" For a wedding slideshow, this means looking way beyond the perfectly posed portraits.
You're looking for a mix that tells the whole story. Think about including:
- Candid Moments: Those unscripted shots of guests roaring with laughter, old friends catching up, or kids tearing up the dance floor. These bring your slideshow to life.
- Detail Shots: Close-ups of the rings, the bouquet, or the tiny details on the cake add texture and a cinematic feel.
- Wide Shots: Images of the entire venue, the full wedding party, or a packed dance floor give a sense of scale and atmosphere.
- Emotional Reactions: A picture of a parent wiping away a tear during the vows? Absolutely priceless. These are the photos that create a real emotional connection.
This process of narrowing down your collection is often called "culling." If you want to get really good at it, our guide on the meaning of culling photos has some fantastic tips to help you pick only the most powerful images for your project.
Arranging Your Story for a Natural Flow
Once you have your final set of photos, it's time to arrange them. The easiest and most effective way to do this is chronologically. It creates a natural narrative that’s simple for your audience to follow from one moment to the next.
For a wedding, that flow usually looks something like this:
- Getting Ready
- The Ceremony
- Portraits and Group Shots
- Cocktail Hour and Mingling
- The Reception, Toasts, and Dancing
But don't be afraid to mix it up a bit. You could create small thematic sections within that timeline. For instance, a short segment dedicated just to "Family Moments" or a high-energy montage of "Friends on the Dance Floor" can be a really powerful way to highlight key people and memories.
Remember, the order of your photos sets the rhythm of your slideshow. A logical sequence ensures the story builds emotionally, leading your audience on a journey that feels both intentional and heartfelt.
Finally, do a quick quality check. Ditch any photos that are too blurry or poorly lit to see what's going on. Most slideshow software and photo apps have simple, one-click editing tools to brighten a dark shot, make the colors pop, or crop an image for better focus. A few small tweaks can make a massive difference, turning good photos into great ones and giving your final slideshow a truly professional polish.
Choosing the Perfect Soundtrack and Setting the Pace
Music is what gives a memory slideshow its soul. It's the difference between a simple click-through of pictures and a truly emotional journey. The right song can amplify every feeling you want to share, from the heartfelt romance of a wedding to the laugh-out-loud energy of a milestone birthday. Think of it as the invisible thread tying the whole story together.
Your soundtrack is basically a co-narrator. For a wedding slideshow, maybe it’s an acoustic cover of the couple's song that creates a warm, intimate vibe. For a 40th birthday bash, an upbeat anthem from their high school days will get everyone smiling. The trick is to match the music's mood to the event and the specific story you're telling on screen.
Timing Your Photos to the Music
Pacing—how long each photo stays on screen—is just as critical as the music itself. When you time your photo transitions to the rhythm of the soundtrack, you get a polished, cinematic feel that keeps your audience hooked. A fast-paced pop song just begs for quick cuts, while a slow ballad needs longer, more thoughtful screen time for each image.
A solid rule of thumb is to show each photo for 3-5 seconds. This gives everyone enough time to take in the image without getting bored or feeling rushed. But don't be afraid to break that rule for your showstopper photos. You'll want to linger a bit longer on a key moment, like the first kiss or a candid shot of the graduate's proud parents, to really let the emotion land.
Pro Tip: Try to time a big reveal or an especially joyful photo with a beat drop or the moment a song’s chorus kicks in. It’s a simple trick, but it creates a huge emotional payoff and makes your slideshow feel incredibly intentional and dynamic.
Below is a quick guide to help you match your music and pacing to the occasion.
Slideshow Music and Pacing Guide
This table offers suggestions for choosing music and setting the right photo timing to create a specific mood for different events.
| Event Type | Suggested Music Genre | Ideal Slideshow Length | Pacing (Seconds per Photo) |
|---|---|---|---|
| Wedding | Acoustic, Classical, Sentimental Pop | 5-7 minutes | 4-6 seconds (longer for emotional shots) |
| Milestone Birthday | Upbeat Pop, Rock Anthems, Throwback Hits | 4-6 minutes | 3-4 seconds (quicker for party scenes) |
| Graduation | Inspirational, Upbeat Indie, Anthemic Pop | 3-5 minutes | 3-5 seconds (mix of reflective and celebratory) |
| Memorial / Tribute | Instrumental, Classical, Soft Folk | 5-8 minutes | 5-7 seconds (slower, more contemplative pace) |
| Family Vacation | Fun Pop, Tropical House, World Music | 3-4 minutes | 2-4 seconds (fast-paced and energetic) |
Ultimately, these are just starting points. The most important thing is to choose music that feels authentic to the people and moments you're celebrating.
Weaving a Seamless Audio Narrative
If your slideshow is longer than one song, you'll need to blend multiple tracks together. The goal is to make the transitions so smooth your audience barely notices them. Most slideshow tools have a "fade in/fade out" feature, which is your best friend here. It perfectly dissolves the end of one song into the beginning of the next, guiding your audience through different chapters of the story without any jarring cuts.
To sidestep any copyright headaches, especially if you plan on sharing your slideshow on social media, stick with royalty-free music. Sites like Epidemic Sound, Artlist, or even the free YouTube Audio Library are treasure troves of high-quality tracks you can use worry-free. Finding that perfect, legally-safe song is the final touch that takes your slideshow from good to absolutely unforgettable.
Assembling and Sharing Your Final Slideshow
Alright, your photos are curated and you’ve got the perfect soundtrack. Now for the fun part: bringing it all together into a polished, final slideshow. This is where your collection of individual moments truly becomes a seamless story. And don't worry, you don't need to be a video editing wizard to create something beautiful.
Plenty of tools are designed to make this easy. Free options like Google Photos or the built-in video editor on your computer can get the job done surprisingly well. If you want a bit more creative control, platforms like Canva have fantastic templates that make assembling your slideshow a breeze.
Adding Polished Transitions and Titles
When it comes to a professional-looking slideshow, subtlety is key. You want the focus squarely on the photos, not on over-the-top effects that scream "early 2000s PowerPoint."
Stick to simple, elegant transitions that create a smooth, natural flow between images.
- Fades and Dissolves: These are your best friends. A gentle fade to black before the next image appears or a soft dissolve between two photos feels cinematic and lets the moments breathe.
- Avoid Distractions: Steer clear of complex animations like spins, wipes, or starbursts. Trust me, they can make the final product feel dated and pull attention away from the heartfelt content.
To add some structure, think about using short, meaningful title cards. A simple slide with text like "The Early Years" or "Celebrating with Friends" can introduce different chapters of your story, guiding your audience through the narrative you’ve so carefully built.
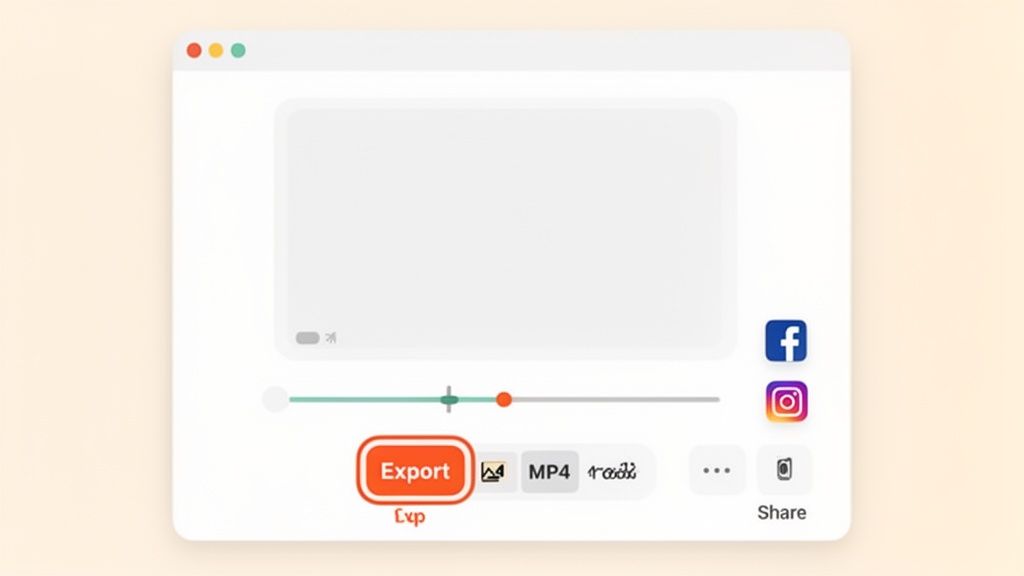
Finalizing and Exporting Your Slideshow
Before you hit that export button, do one last review. I always recommend watching the entire slideshow from start to finish. This is your chance to check the pacing and make sure the transitions feel right with the music's rhythm. You'd be surprised what small errors you can catch with a final once-over.
When you're ready to save your masterpiece, the format you choose really matters. For pretty much any use case, an MP4 file is the universal standard. It gives you a great balance of high quality and a manageable file size.
Think about where your slideshow will ultimately be seen. Exporting in 1080p resolution is perfect for displaying on a large TV or projector at your wedding or event. If you're mainly sharing on social media or sending it in an email, a slightly lower 720p resolution will create a smaller file that’s much easier and faster to upload.
Crafting a memory slideshow is so much more than a technical task; it's about turning beautiful, raw moments into a story you'll cherish forever. The demand for these kinds of shareable, personal narratives is a major reason why the wedding photography market soared to USD 23.36 billion in 2024 and is projected to nearly double by 2033. You can explore more insights into these industry trends on Business Research Insights.
Once it's exported, your slideshow is ready to be shared and treasured for years to come.
Got Questions? We've Got Answers
Even when you have a solid plan, a few questions always pop up, especially when you're in the thick of creating your slideshow. Let's tackle the most common ones so you can keep moving forward with confidence.
How Many Photos Should I Use?
For a slideshow that runs about 5-10 minutes, the magic number is somewhere between 100 and 200 photos. Trust me on this.
That pacing gives each picture about 3-5 seconds on screen—just enough time for everyone to soak it in before the next one appears. It keeps things moving without feeling like a frantic flipbook. For a wedding, this range is perfect for telling the whole story, from the getting-ready jitters to the last dance, without making your guests feel like they're stuck in a time warp.
What’s the Easiest Way to Get Photos from Guests?
Hands down, the simplest and most modern way is using a QR code system. Forget chasing people down via text or email—that’s a nightmare. With a QR code, guests just point their phone's camera, scan, and can instantly upload their photos to your private gallery.
The real beauty of this method is its ease of use for your guests. There is absolutely no app download required, which is a huge barrier for a lot of people. Stick the QR code on a sign at the entrance, on table cards, or even on your invitations, and the photos will start rolling in seamlessly.
Are These Slideshow Tips Only for Weddings?
Not at all! While a wedding is a natural fit, these same steps work brilliantly for just about any event worth remembering. You can easily adapt this whole process to create a killer slideshow for:
- Birthday Parties: Perfect for celebrating a milestone birthday with a trip down memory lane.
- Corporate Gatherings: A great way to recap a successful project or show off the fun from a team-building event.
- Family Reunions: Nothing brings generations together like a collection of cherished family photos.
- Anniversaries and Graduations: The perfect tribute to major life achievements.
The only thing that changes is the story you're telling. Just adjust the photo choices and the music to match the vibe of the event, and you're good to go. It's an incredibly versatile way to make those memories last.
Ready to effortlessly collect every photo from your big day? With WedPicsQR, you can create a private gallery and a unique QR code in minutes. Guests can upload photos instantly with no app required, ensuring you get every candid moment. Visit the WedPicsQR website to get started for free.