Best Way to Create a Slideshow of Photos: Quick, Stunning Results for Events
Want to know the secret to a knockout photo slideshow? It’s not about the software—it’s about getting the photos in the first place. The best way to create a slideshow of photos is to make collecting pictures completely painless and instant.
Forget chasing down guests for weeks after your event. The real game-changer is using a seamless, app-free platform where people can scan a QR code and instantly upload their photos. This effortless process builds a complete, real-time gallery you can pull from to create an amazing final video.
The Secret to a Perfect Slideshow Is Instant Photo Collection
The foundation of a truly memorable slideshow isn't the fancy transitions or the perfect song. It all comes down to the photos you have to work with. The old way of doing things—hounding friends and family for their pictures or just waiting on the professional photographer—is a recipe for stress and a less-than-complete story.
But what if you could consolidate photos from all your guests, effortlessly and in the moment?
Picture this: you place a simple QR code at the venue. For example, you can display your event’s QR code at the venue entrance or on invitations for instant photo uploads. Guests just point their phone's camera at it, and they're immediately taken to a private gallery where they can upload their candid shots. The best part? There’s no app to download and no clunky sign-up process. It's incredibly easy to use and removes all the friction.
Transform Guests into Your Event Photographers
This simple trick turns every single guest into a co-creator, capturing dozens of unique angles and spontaneous moments that one photographer could never catch alone. While our primary focus is making this process seamless for weddings, this system is a powerhouse for all kinds of events:
- Birthdays: Finally get all the great shots from friends and family in one place—from the surprise entrance to the last candle being blown out.
- Corporate Gatherings: Easily consolidate photos from team-building days, holiday parties, and conferences without sending a single follow-up email.
- Family Reunions: Create a single, organized album that captures memories from every generation, all in one spot.
This collaborative approach is becoming more common, especially in the massive $23.36 billion global wedding photography market. While photographers used to deliver huge galleries of 1,200–2,000 images, the modern trend is shifting toward smaller, more curated collections that blend professional shots with authentic guest photos. If you're planning an engagement, mapping out your photo strategy is crucial. This ultimate guide to engagement photo sessions is a great resource for capturing those perfect moments from the start.
The easier you make it for people to share their photos, the richer and more diverse your collection will be. These instantly available pictures become the raw material for a slideshow that tells the complete story of your event, packed with genuine emotion.
This is what sets a good slideshow apart from a great one. You’re building a comprehensive gallery in real time. Instead of waiting for photos to trickle in, you’ve got a full library ready to go, which makes creating the final video faster, easier, and so much more personal. To get started, you can learn more about how to set up your own shared photo album and make your next event a breeze.
Setting Up Your Instant Photo Collection Hub
Let's get the foundation right. Creating a central hub for all your event photos is way faster and easier than you might think. This is the magic step where you consolidate photos from dozens of scattered phone galleries to one clean, organized source for your slideshow. The entire system is designed for ease of use, getting you up and running in just a few minutes.
The system revolves around a unique QR code. Once you have it, that code is the only thing your guests need. There's no app requirement, which is a huge win. Even your least tech-savvy relatives can jump in. All it takes is a quick scan with their phone's camera for instant photo uploads.
Making It Effortless for Everyone
If you want people to share photos, you have to make it dead simple. The entire experience, from a guest scanning the QR code to uploading their pictures, is designed to be completely intuitive and easy. Because nobody has to download an app or create an account, they're far more likely to share their favorite shots right in the moment.
This seamless approach is what makes it so versatile beyond weddings. I've seen it work wonders for all kinds of events:
- Corporate Gatherings: Finally, an easy way to consolidate photos from a multi-day conference or team retreat without chasing everyone down on Slack.
- Birthday Parties: Capture every single candid moment from dozens of different angles, instantly.
- Family Reunions: Build a collaborative album that every branch of the family can add to in real time.
Get Creative with QR Code Placement
To get the most photos, you need to make your QR code impossible to miss. Don't just stick a sign at the entrance and call it a day. The more creative you get with placement, the more photos will pour in. For instance, you can display your event’s QR code at the venue entrance or on invitations for instant photo uploads.
The goal is to weave the photo collection right into the event itself. When guests see the QR code multiple times in different spots, it's a gentle, constant reminder to share the great moments they're capturing on their phones.
Think about putting them in places people naturally look:
- On cocktail napkins or coasters at the bar
- As part of the centerpiece on each table
- On a large screen during breaks or between speakers
- Tucked into the event program or schedule
We've got more ideas and a full walkthrough waiting for you. Check out our guide on how to create QR codes for photo sharing. This will ensure your collection hub isn't just easy to set up, but actually gets you every possible memory from your event.
Curating Your Photos from Chaos to a Cohesive Story
Alright, your event gallery is officially overflowing with photos from every angle, thanks to the seamless QR code uploads from your guests. This is where the real fun begins. Creating a powerful slideshow isn't about dumping every single picture onto a timeline—it's about finding the story hidden inside all that happy chaos. This is the art of curation.
The trend in modern weddings has moved sharply away from those massive, thousand-photo digital dumps. Instead, couples and photographers are focusing on smaller, more cinematic galleries that feel intentional. This "quality over quantity" approach makes for a much better viewing experience. Plus, as many pros will tell you, it can slash editing time by as much as 60%, freeing you up to focus on the artistic touches.
This flowchart gives you a simple way to think about where to place your QR codes to get the best collection of photos from your guests.
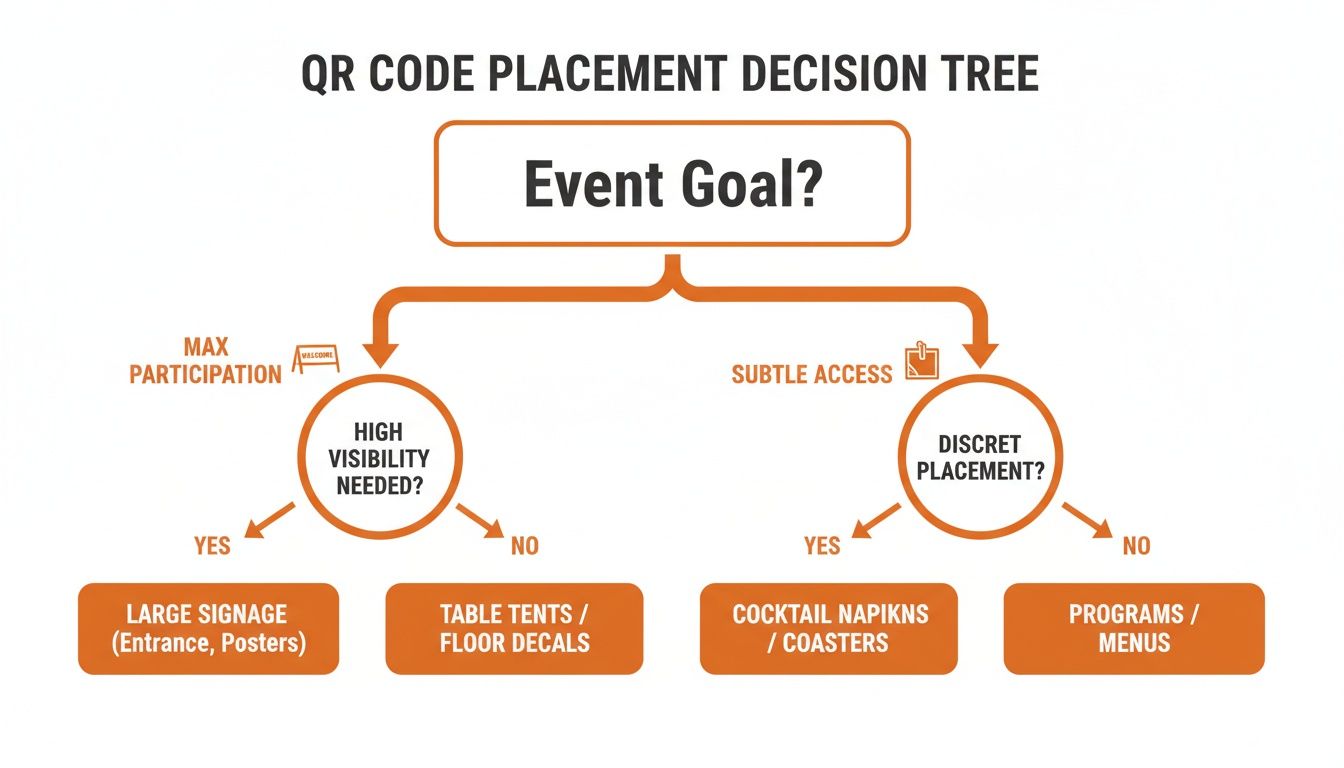
As you can see, what you want to achieve with your photo collection directly points to the best placement strategy, making sure you get the shots you need without getting in the way of the party.
Weaving Your Narrative Thread
Once you have consolidated all your photos in one place, the next job is to start grouping them to create a natural flow. The goal is to make the slideshow feel like a journey, not just a random flip-book of pictures. You're guiding the viewer through the event's emotional highs and lows.
Here are a few ways you can organize the story:
- Chronological Order: This is the classic, most straightforward approach for a reason. Start with getting-ready shots, move into the main event, and finish strong with the celebration. It builds momentum naturally and is super easy for anyone to follow.
- Thematic Grouping: This can be a really powerful way to structure your slideshow. You could create sections for "Candid Laughter," "Tearjerker Moments," or "Dance Floor Mayhem." It’s perfect for showing off different facets of the day.
- Emotional Pacing: Think like a movie director. Start with quiet, intimate moments. Build to a big, energetic crescendo with group shots and dancing, then bring it back down for a heartfelt, reflective ending. This creates a cinematic feel that really sticks with people.
Photo Curation Strategies for Your Slideshow
Choosing the right photos is part art, part science. This table breaks down a few common curation styles to help you find the one that best tells your story.
| Curation Style | Best For | Key Tip |
|---|---|---|
| The Storyteller | Events with a clear beginning, middle, and end (like weddings). | Follow the day's timeline. Don't be afraid to skip less important moments to keep the pace moving. |
| The Emotionalist | Highlighting the feeling and vibe of the event. | Group photos by mood—joyful, sentimental, energetic. Music choice is critical here. |
| The Documentarian | Capturing a comprehensive look at the event and all its details. | Include a mix of people, decor, and location shots. Great for memorializing the full experience. |
| The Minimalist | Short, high-impact slideshows for social media or quick shares. | Be ruthless. Pick only the absolute best 15-20 photos that capture the essence of the day. |
Ultimately, the best strategy is often a blend of these. Start with a chronological base, but don't be afraid to group a few thematic moments together to create more impact.
Selecting the Most Impactful Shots
Culling is a critical skill. It’s about picking the photos that do the heavy lifting for your story. You have to be a little ruthless here. Instead of showing five nearly identical group photos, pick the one where everyone’s expression feels the most genuine. If you want to get better at this, check out our guide on the meaning of culling photos.
Your final selection should be a beautiful mix of polished professional shots and those raw, candid gems from your guests. The real magic is often in those in-between moments that only a friend or family member could have caught.
Keep an eye out for these types of shots:
- Raw, unposed reactions.
- Group shots from different circles of friends and family.
- The little details that capture the venue’s atmosphere.
- The photos that just radiate the pure energy of the celebration.
By taking the time to carefully curate your collection, you’re not just making a slideshow. You’re creating a tight, emotionally powerful film that truly honors the spirit of your event.
Building Your Slideshow with Music and Pacing
Alright, your photos are organized and ready to go. Now for the fun part: turning that folder of images into a story that moves people. To really nail this, you need to focus on three things: the software you use, the music you pick, and how you pace everything.
The good news? You don't need a degree in film editing. Modern slideshow makers are incredibly intuitive and easy to use, with drag-and-drop tools that do most of the heavy lifting. Platforms like Animoto, Adobe Express, or Clipchamp are fantastic places to start. They hit that sweet spot between being easy enough for a beginner but powerful enough to give you creative control.
Finding the Heartbeat with Music
Music isn't just background noise; it's the soul of your slideshow. It sets the tone and drives the emotion. You want the soundtrack to follow the emotional arc of your event.
For a wedding slideshow, you could start with a soft instrumental piece for the ceremony pictures, then kick it up with a fun pop song for the reception shots, and finally wind down with a heartfelt ballad.
Don't just pick your favorite songs. Listen to the rhythm and energy. A song with a strong, steady beat is great for quick cuts and high-energy moments, while a slower, more melodic track gives you space to let emotional photos breathe.
Think about which approach fits your story best:
- A Single, Powerful Song: This works wonders for shorter slideshows (think under three minutes). It keeps the mood consistent and impactful.
- A Multi-Song Medley: If you're telling a longer story, mixing a few songs allows you to shift the mood, maybe from sentimental and teary-eyed to upbeat and celebratory.
- Instrumental Tracks: A great choice when you want the photos to do all the talking. No lyrics means no distractions from the powerful images on screen.
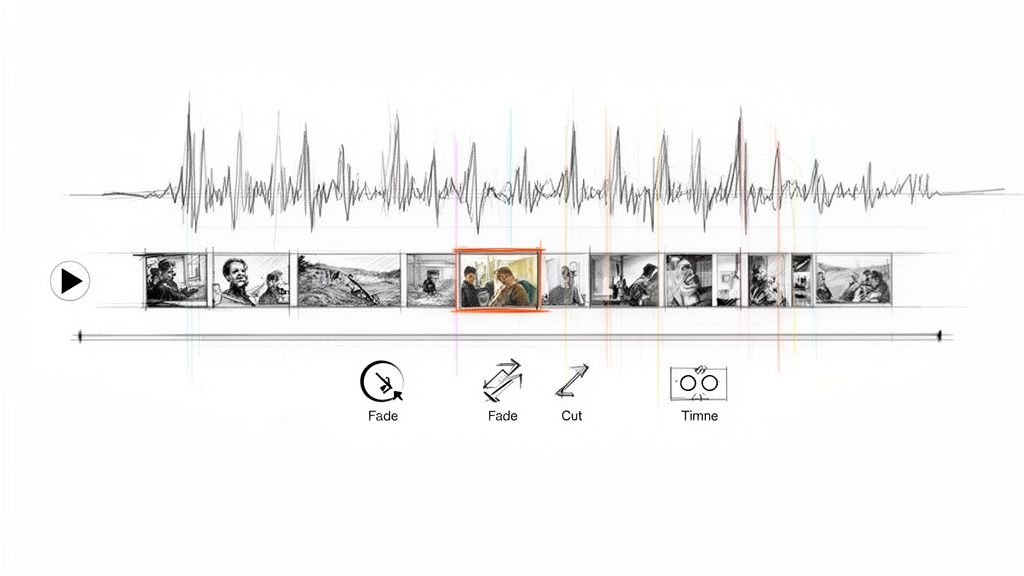
Mastering Transitions and Pacing
Transitions are the bridges that connect your photos, and pacing is how fast you walk across them. Together, they control the entire flow. My advice? Keep it simple. Over-the-top star wipes and crazy spins usually just look cheesy.
A classic cross-dissolve or a simple fade creates a smooth, timeless feel—perfect for those heartfelt moments. On the flip side, a hard cut—where one photo instantly flips to the next—can build a ton of energy when you time it to the beat of the music.
Pacing is all about timing. Not every photo needs the same amount of screen time. Linger on the important ones. That candid photo of the bride laughing, the shot of a quiet hug, the big group photo—let those sit on the screen for an extra second or two so the viewer can really take them in. Then, for high-energy parts like the dance floor, speed things up with a quick succession of shots to build excitement.
If you want to dig deeper into the basics of transforming static images into something more cinematic, there's a great guide on converting photos into engaging videos. By pairing the right music with simple transitions and deliberate pacing, you'll create a slideshow that feels less like a photo album and more like a cherished memory brought to life.
Sharing and Displaying Your Finished Slideshow
You’ve done the hard work—curating the photos, finding the perfect song, and creating a slideshow that tells the story of your event. Now for the best part: sharing your masterpiece. The final step is getting it in front of your guests, whether they’re in the room or across the country.
First, let's talk tech. You need to get your export settings right, and this depends entirely on where people will be watching. If you're projecting it at a venue, like on a big screen during a post-wedding brunch, you’ll want high resolution. Exporting at 1080p (Full HD) is the sweet spot for quality and compatibility. Save it as a standard .MP4 file, and pretty much any projector, TV, or computer will play it without a hitch.
Tailor Your Share for Maximum Impact
Let's be real: not everyone is going to sit through a full-length video, especially online. To get the most eyes on your creation, it's smart to chop it up into different formats for different platforms.
- The Highlight Reel: Snip out the best moments and create a short, punchy version—think 30-60 seconds. This is perfect for Instagram Reels or TikTok, where you need to grab attention fast.
- The Full Experience: For the complete slideshow, your best bet is to generate a private link. Use a service like YouTube (just set the video to "Unlisted") or Vimeo. This makes it super easy to email the link to all your guests without splashing it all over the internet.
Closing the Loop with Your Photo Hub
Here’s a pro move: instead of just blasting out a link, bring everything full circle. Embed the final slideshow directly onto the same custom webpage where your guests instantly uploaded their photos in the first place.
This transforms your photo collection hub from a simple gallery into a complete digital keepsake of the event. Guests can revisit the page to see their own contributions and then watch the beautifully curated story you’ve created from them.
Hosting the final video right there creates a seamless, lasting memento. Everyone who chipped in gets to see the final product of their collaborative effort, which makes the whole experience feel that much more special. It’s an elegant finishing touch that reinforces the sense of community from your celebration.
For more inspiration on presenting your photos, check out our guide on how to creatively display photos at your wedding. By thinking strategically about how you share, you ensure your slideshow makes a lasting impression long after the event is over.
Your Top Slideshow Questions, Answered
Making a slideshow should be fun, not a technical mess. As we wrap things up, let's go through some of the most common questions that come up, especially when you're using a QR code to consolidate photos. This should clear up any lingering doubts before you dive in.
The biggest question I always get is, "Will my guests actually use a QR code?" The answer is a huge yes. Because there's no app requirement, all the usual friction is gone. It’s incredibly easy to use: guests just point their phone's camera, a webpage pops up, and they can upload photos instantly. It's just like scanning a restaurant menu—easy enough for everyone from your teenage cousins to Grandma.
How Does Photo Privacy Work?
Your guests' privacy is everything. When you create a gallery, you're the one in charge. Your collection isn't public—only people with the unique QR code or link you share can get in.
This keeps all those heartfelt, candid moments from your event right where they belong: within your trusted circle of family and friends. It's your own private, secure space.
And while our primary focus is weddings, this seamless method is a game-changer for pretty much any gathering:
- Birthdays and Anniversaries: Finally, a way to capture every single smile and toast from all your loved ones in one spot.
- Corporate Gatherings: Effortlessly collect images from team-building events, conferences, and holiday parties without bugging everyone on Slack.
- Reunions: Create a shared family album that everyone can add to in real-time, building a collective memory as it happens.
The process is so smooth and versatile, it’s perfect for any occasion where you want to gather memories without the usual hassle.
Best Practices for Photo Collection
To get the most photos, you have to make the QR code impossible to miss. A great pro tip is to display your event’s QR code at the venue entrance or on invitations for instant photo uploads. It sets the stage right from the start.
You can also put small cards with the code on each table or even have it displayed on screens during the reception. The more visible it is, the more photos you'll get.
Another big question is, "How many photos should I put in the final slideshow?" A good rule of thumb is to aim for a slideshow that's between 3 to 5 minutes long. This usually means about 40-80 photos, depending on how fast you set the timing.
Remember, quality beats quantity every time. A shorter, punchier slideshow will hit much harder than a long, repetitive one. The beauty of consolidating photos this way is that you end up with a huge library to pull from, so you can cherry-pick the absolute best shots that tell your story perfectly.
Ready to create a stunning slideshow without the stress? With WedPicsQR, you can set up a beautiful, private photo gallery in just a few minutes. Give your guests the power to instantly share their memories with a simple QR code scan—no apps, no sign-ups, just seamless photo collection. Start your free gallery today at WedPicsQR and build an unforgettable collection of moments from your special day.